
Step by Step: Upgrade vCenter VCSA 6.0 (or 6.5) to 6.7
These screenshots show the entire process to upgrade vCenter from 6.0 to 6.7 using a Windows 10 desktop as my administrative workstation. The same steps work for vCenter 6.5 to 6.7.
Is your existing vCenter server running on Windows? This article is primarily about upgrading vCenter appliances (linux-based). If you have a Windows vCenter server, check the comments for instructions from Greg Curry. Thanks Greg!
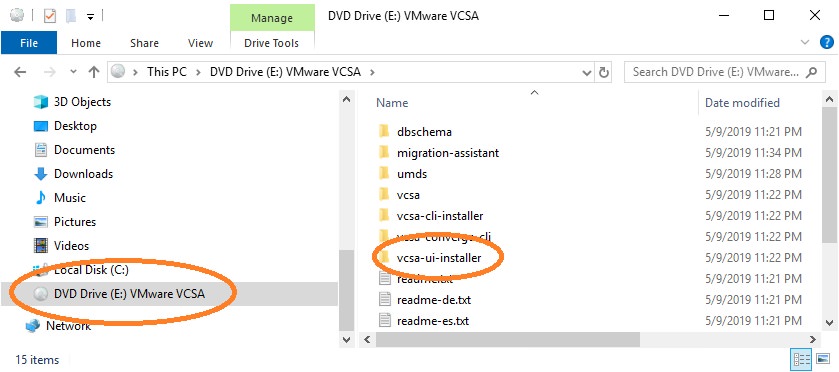
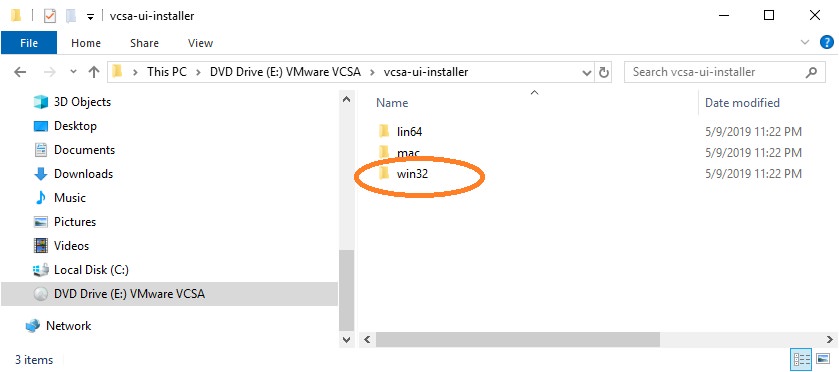
Preparing for the vCenter appliance upgrade
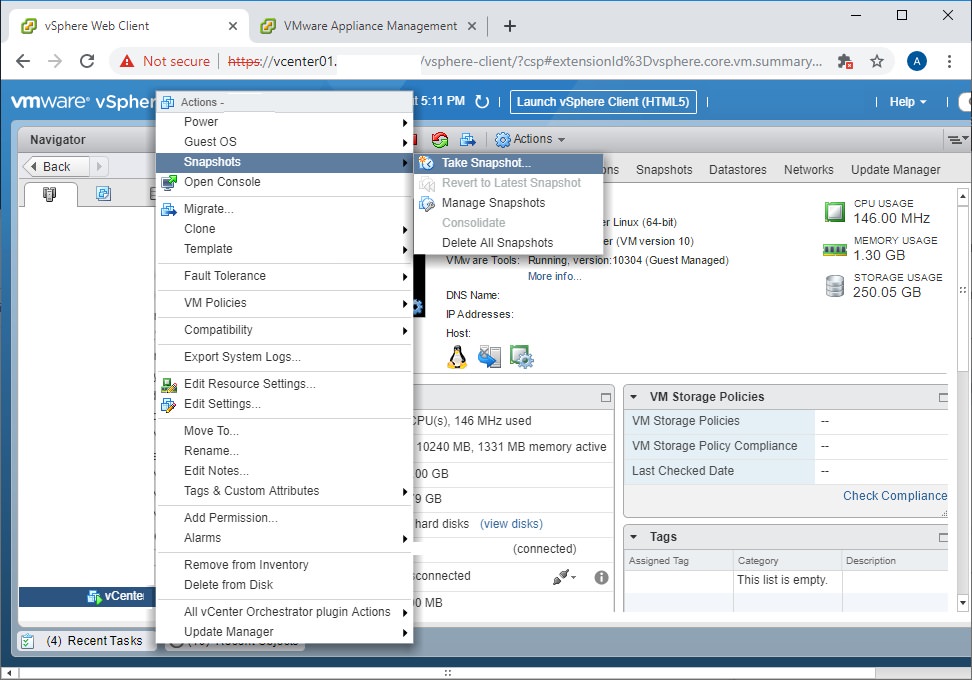
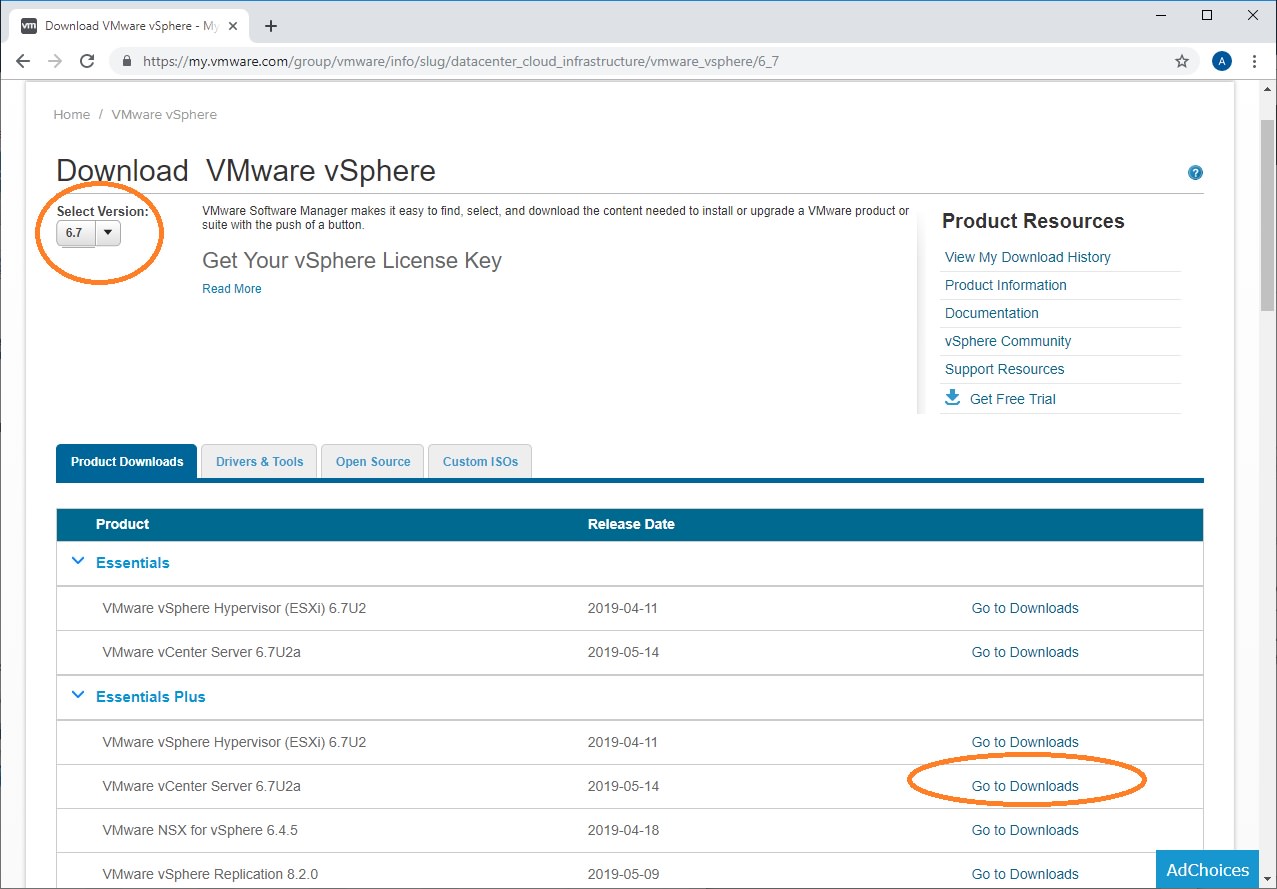
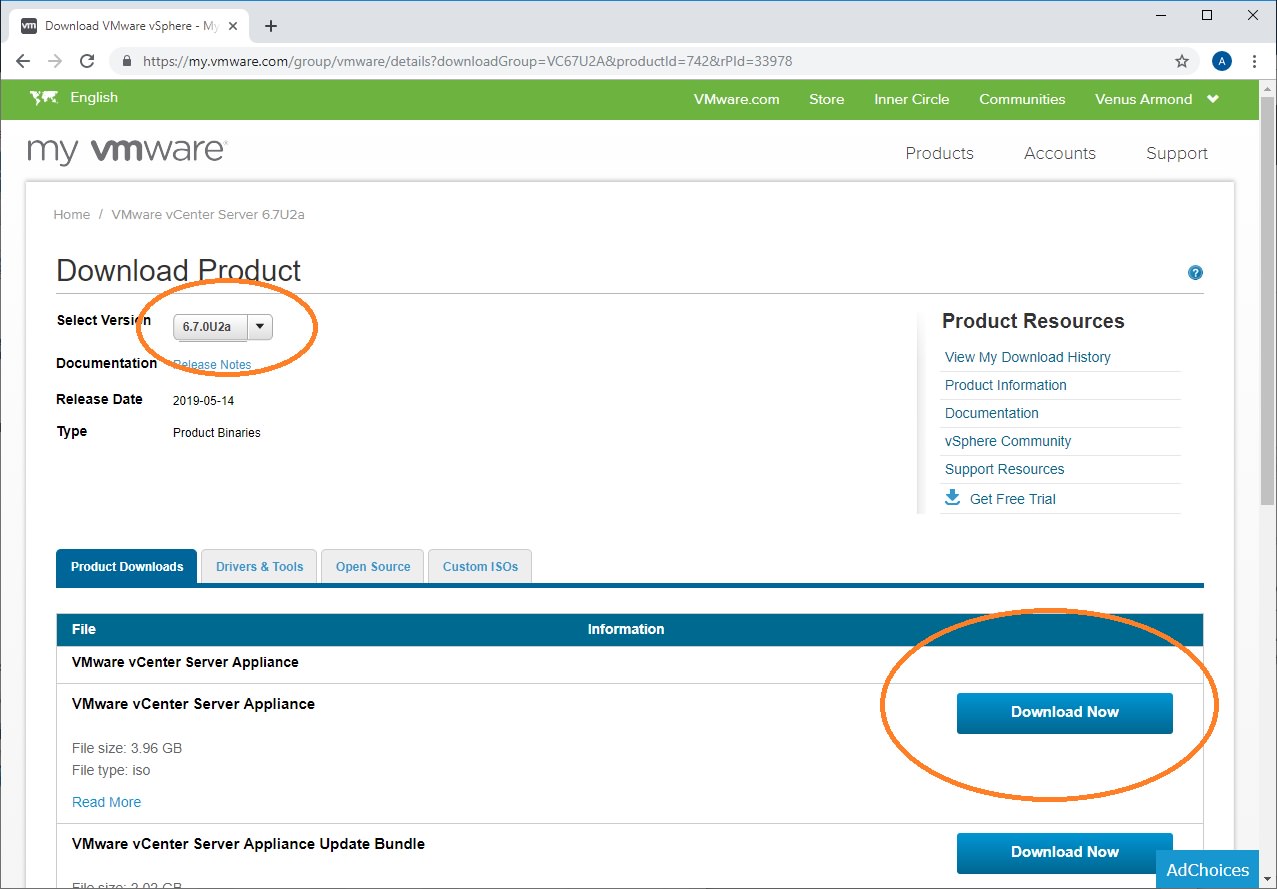
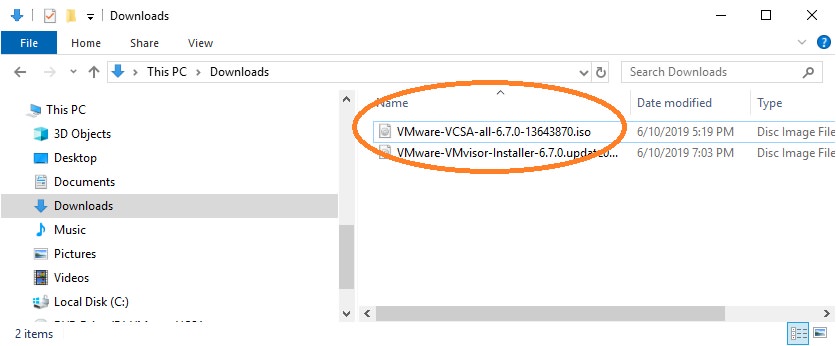

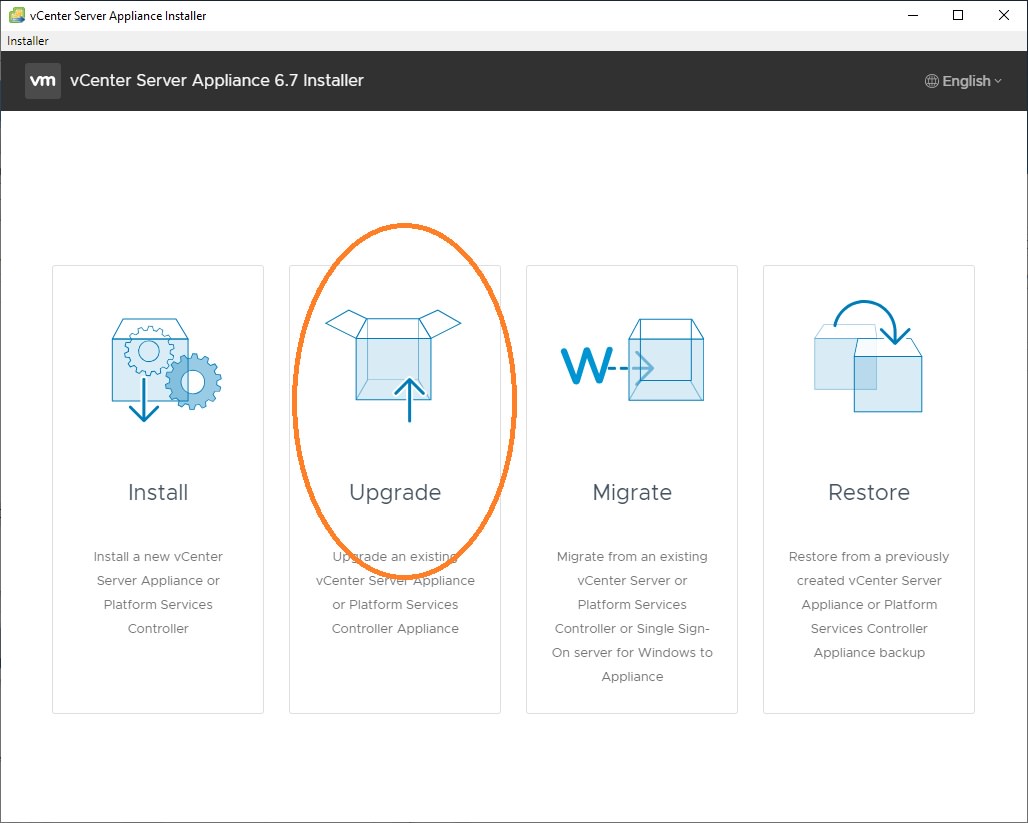
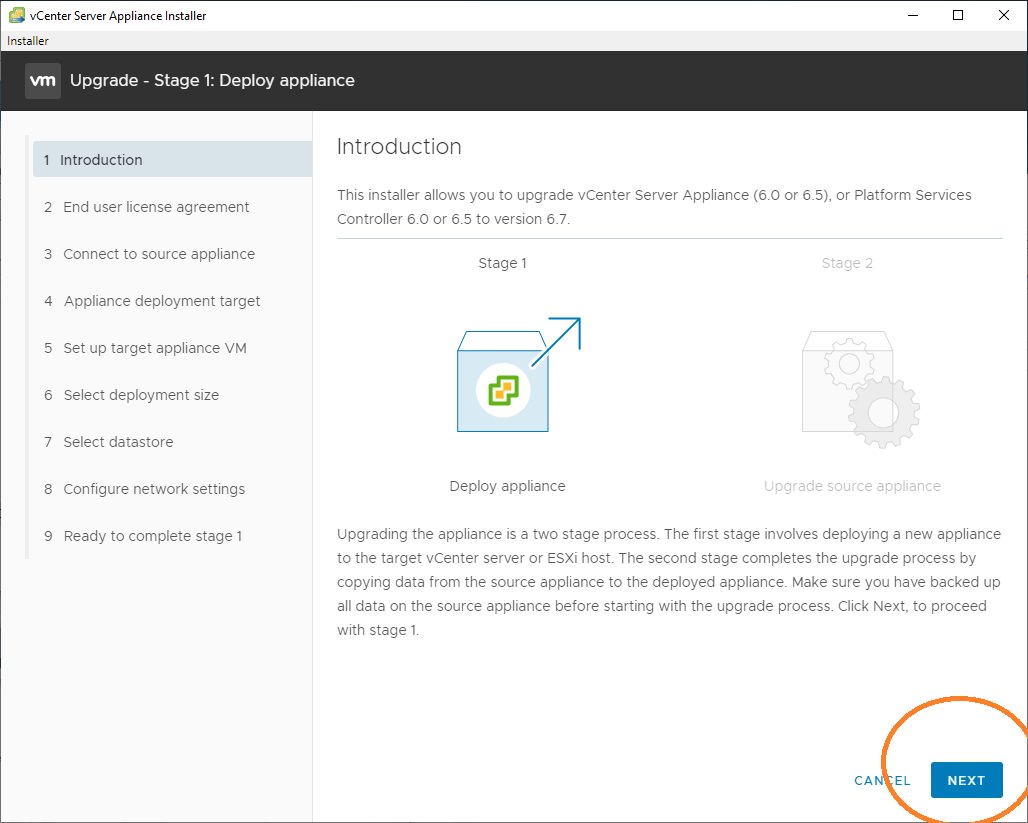
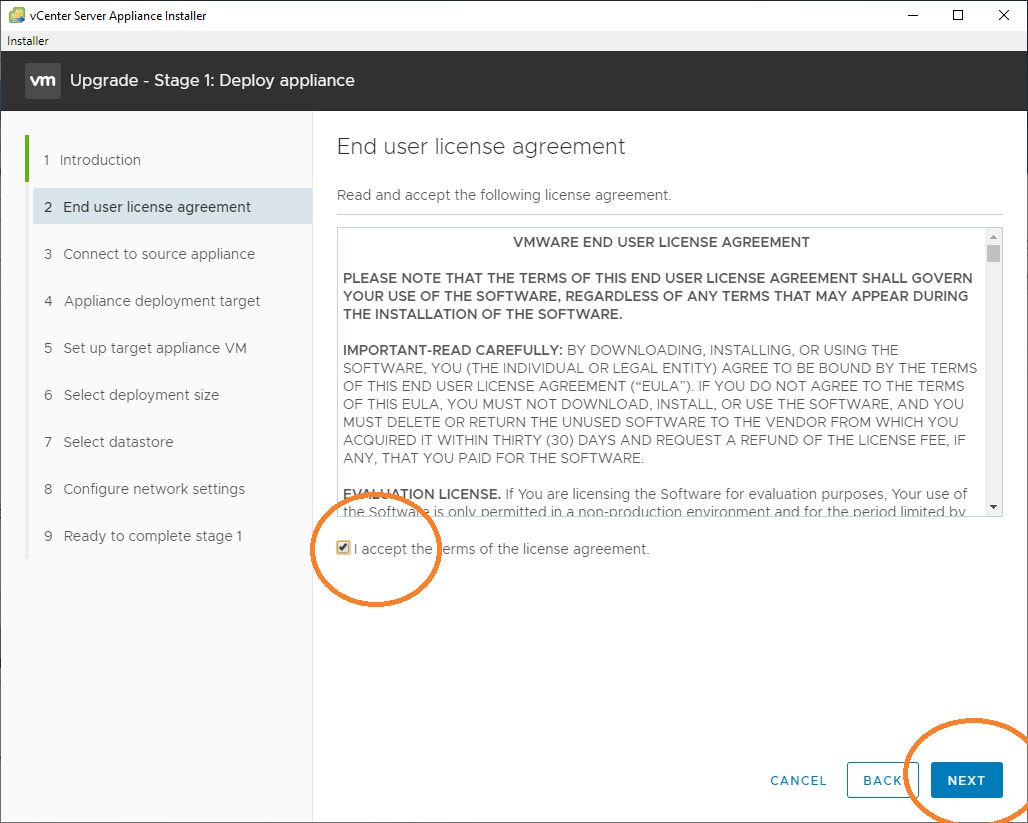
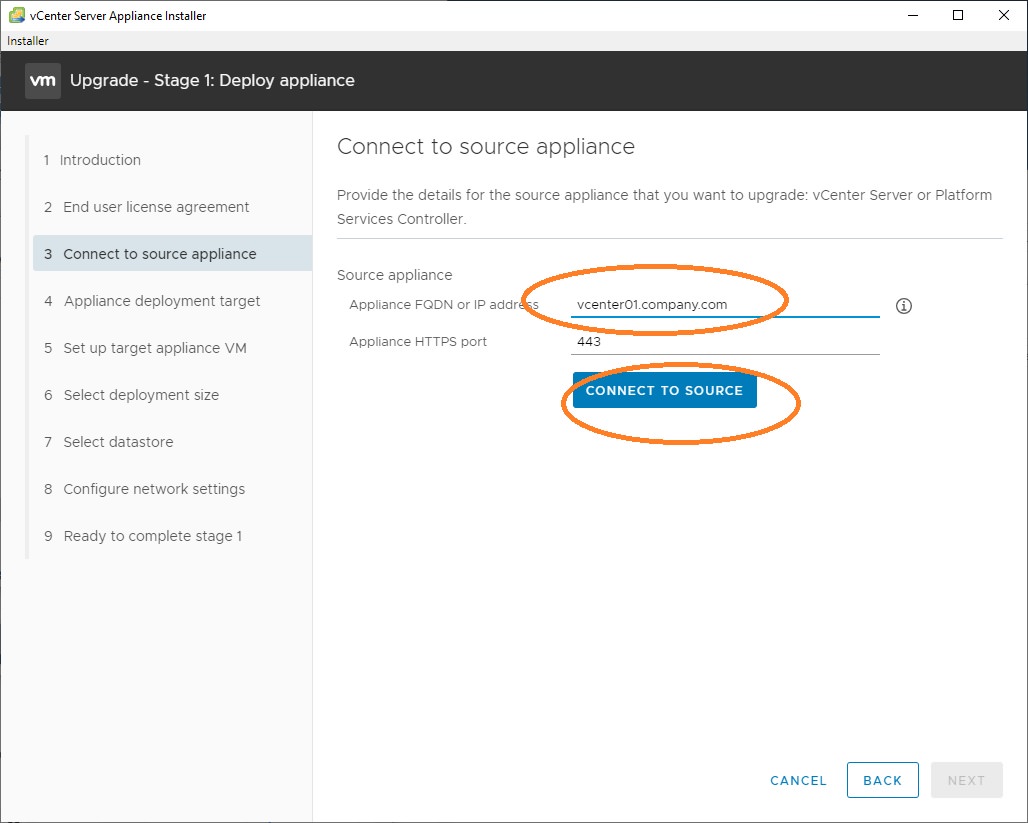
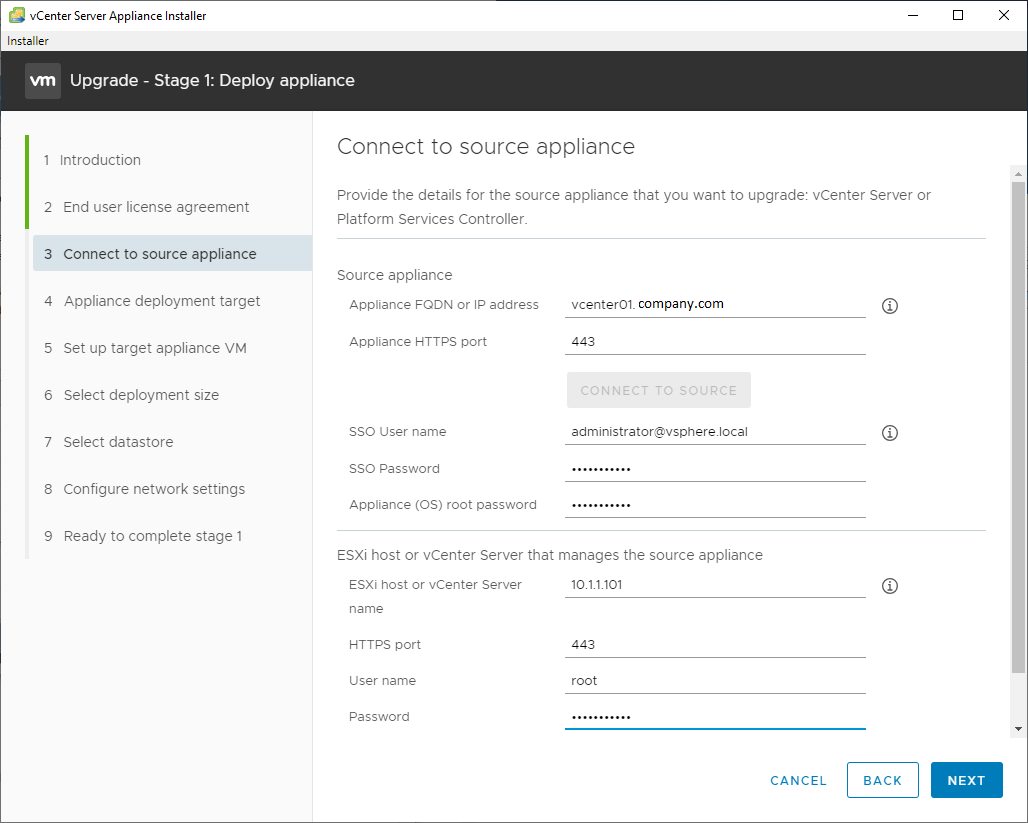
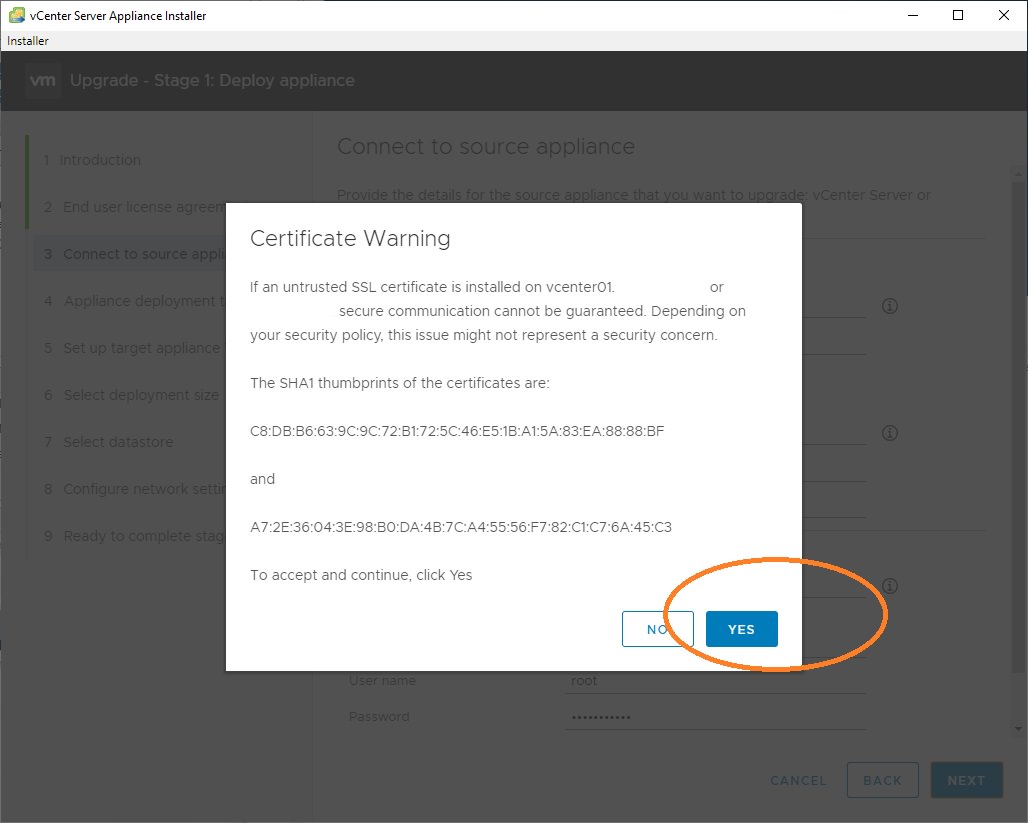
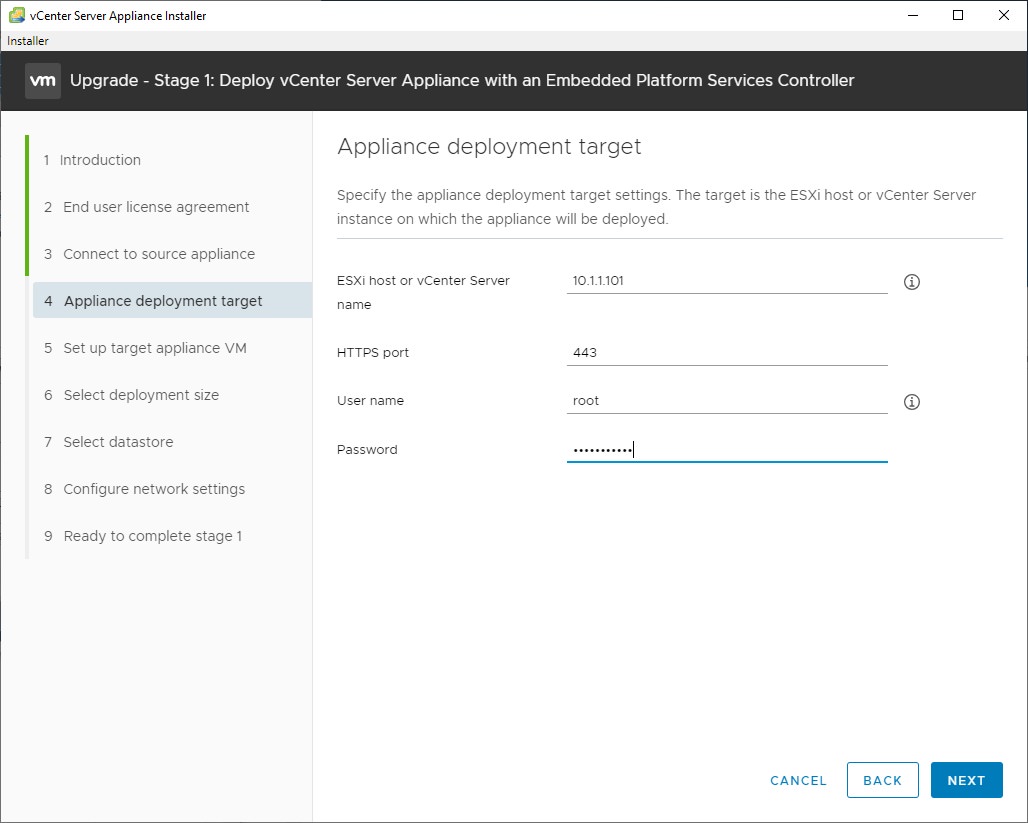
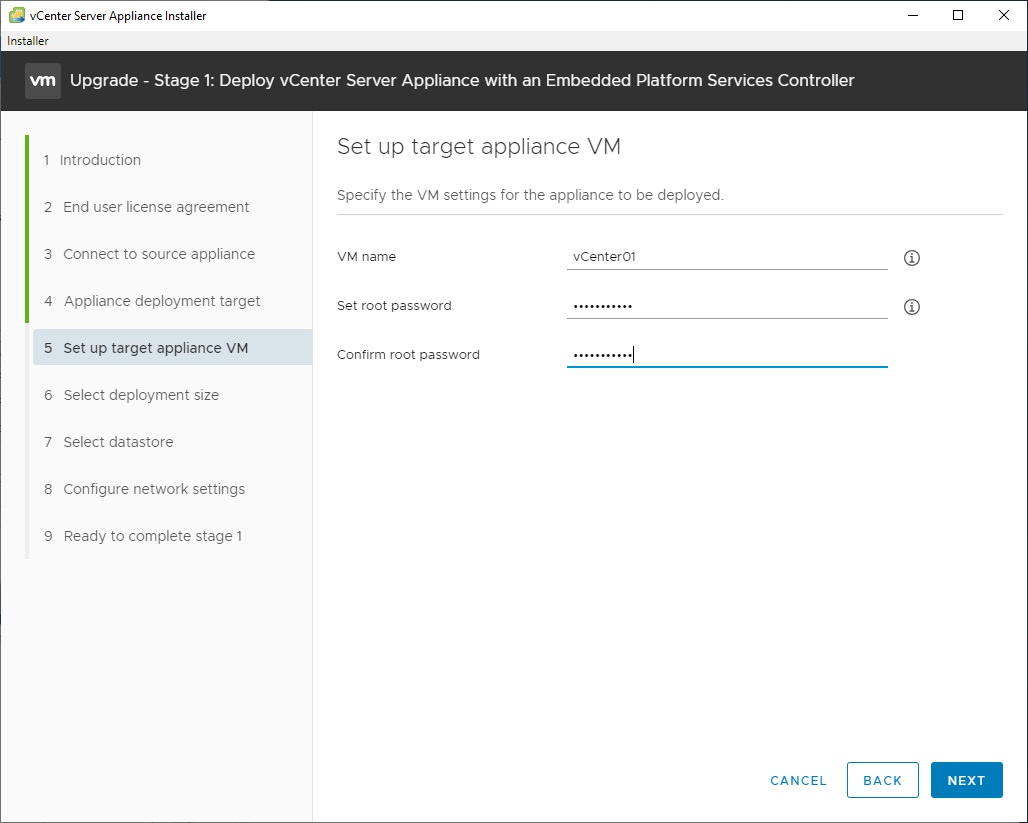
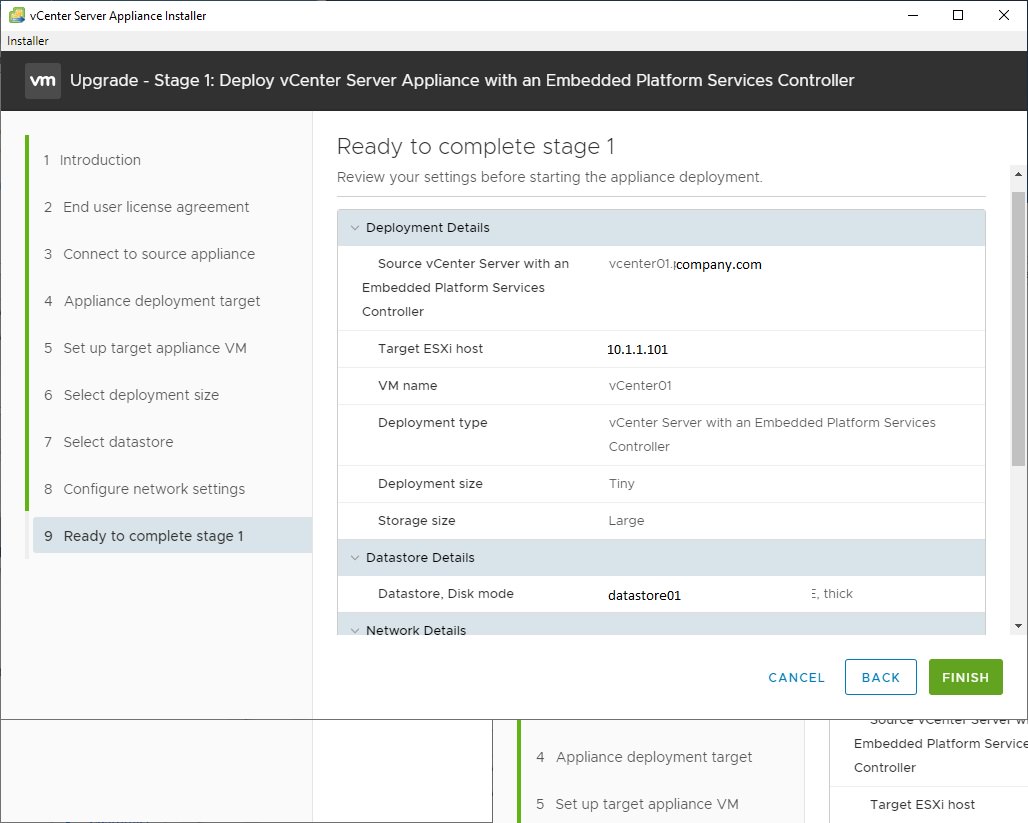
Appliance Upgrade Stage 1
——————
Additional info from Todd who provided this quote in the comments (Thanks Todd!)
I ran into one minor issue during the “Upgrade Stage 1: Deploy Appliance” phase. Operation would halt with “Failed to authenticate with the guest operating system using the supplied credentials.” I know they’re good as I can login to VCSA, VAMI, MOB, ESXi using them.
I changed all of the passwords to numbers and letters only with a single known good special character tacked on at the end. Et Voila! Problem solved. The rest of the upgrade proceeds without errors.
Passwords like these will not work with this utility:
Tv5$8FG#m*Djn
7xjg8sP%C#usXH8H
X8xk$vR^q9ccw@WxR
———————–
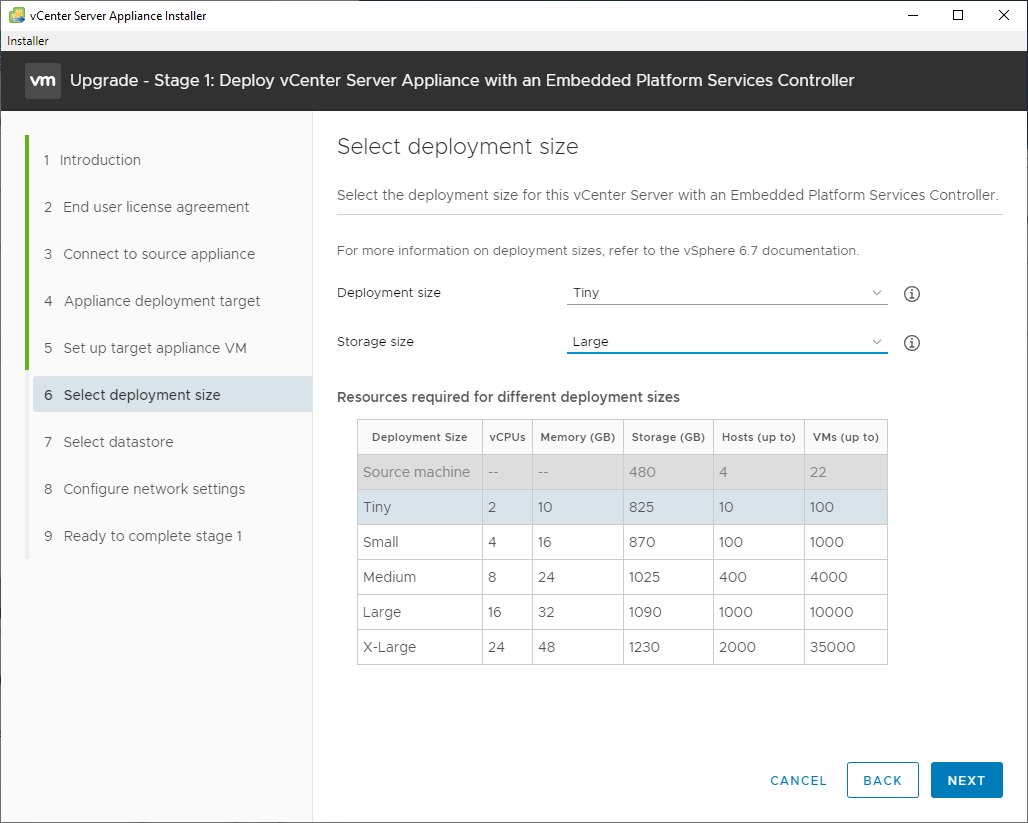
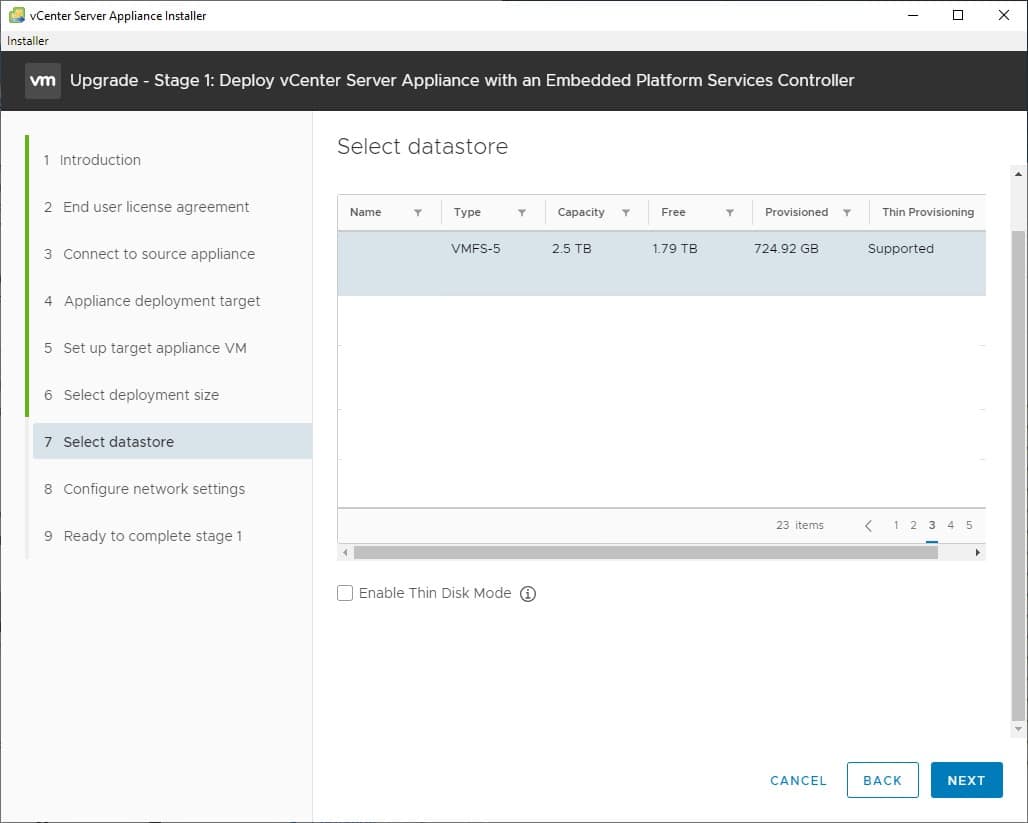
Optional: Check the “Enable Thin Disk Mode” so that your vCenter server uses less disk space (about 80 GB). This is mildly dangerous because the usage can grow over time and cause a datastore to fill up (crashing all VMs on the datastore), but for most small environments it doesn’t grow more than a few GB per year and 850 GB is WAY more than you need.


Errors that can occur during stage 1
If you used the wrong password for the old vCenter, the source host, or the destination host, you may get an error at this point.
If you are on an unstable VPN link, you may get an error. Try running the upgrade from a workstation or server on the LAN.
If you used DNS instead of IP addresses, try changing to IP addresses.
Temporary IP error: The upgrade will attempt to ping the IP address you chose for the temporary vCenter IP address. If it pings, the upgrade will fail. Make sure nothing is using that IP.
For information about cleaning up failed upgrade steps, see troubleshooting at the bottom of the article.
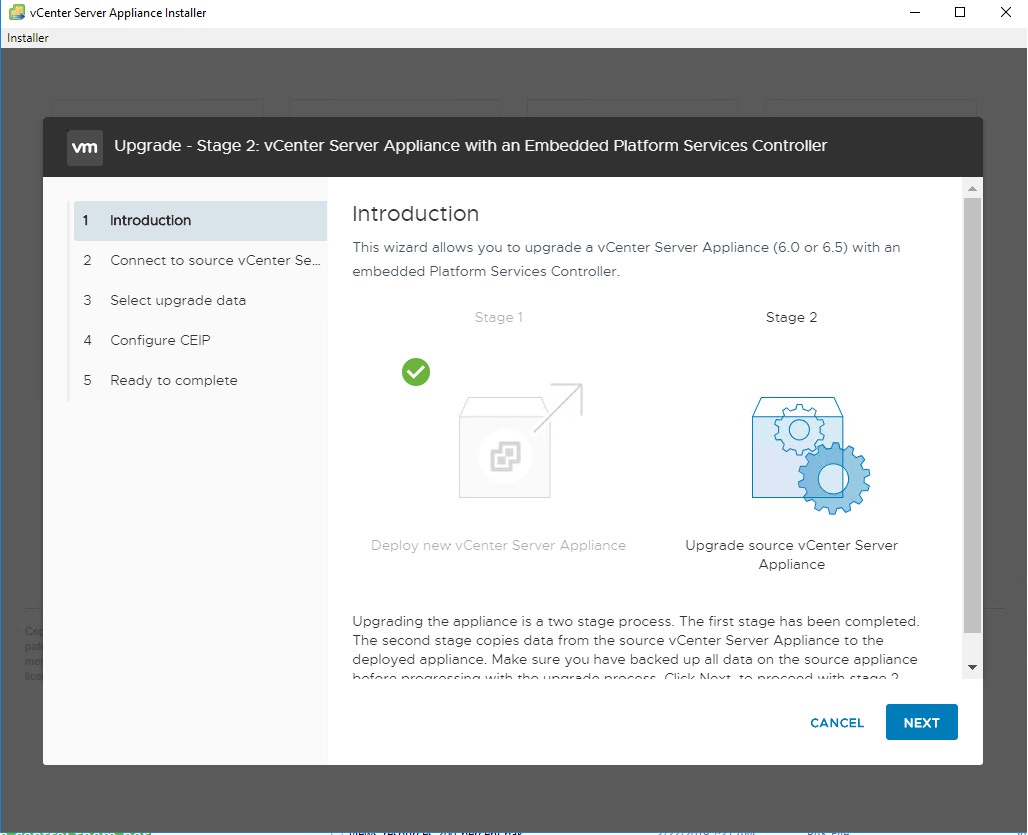
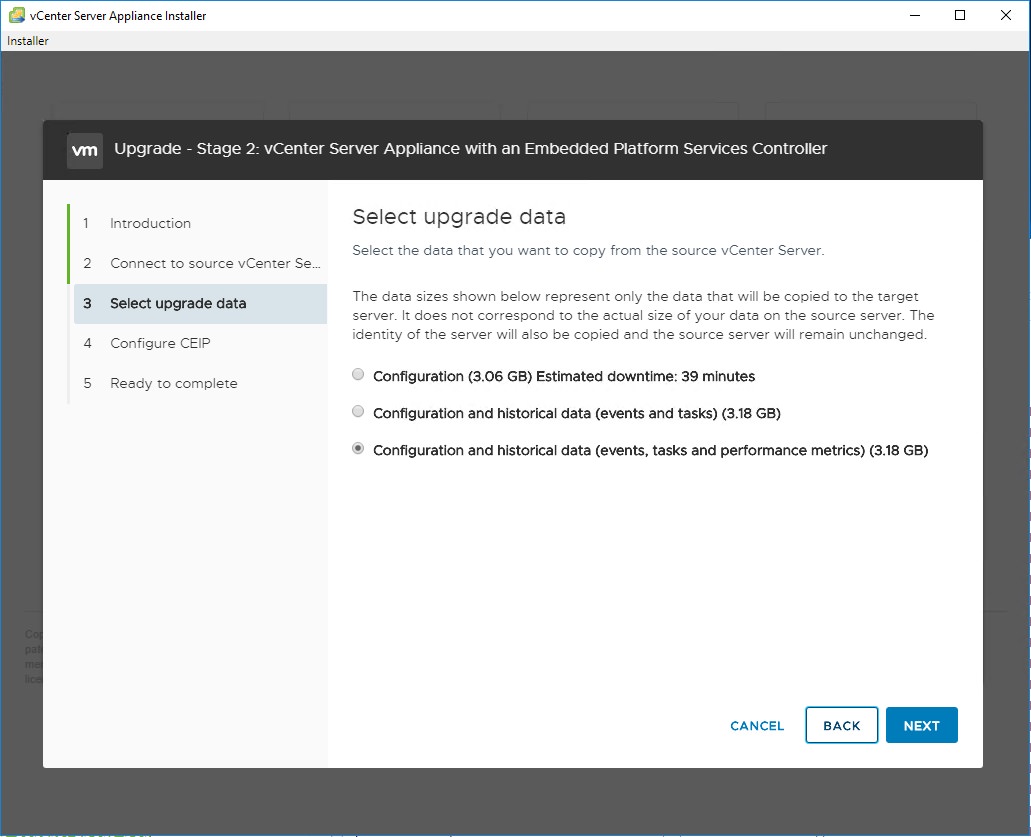
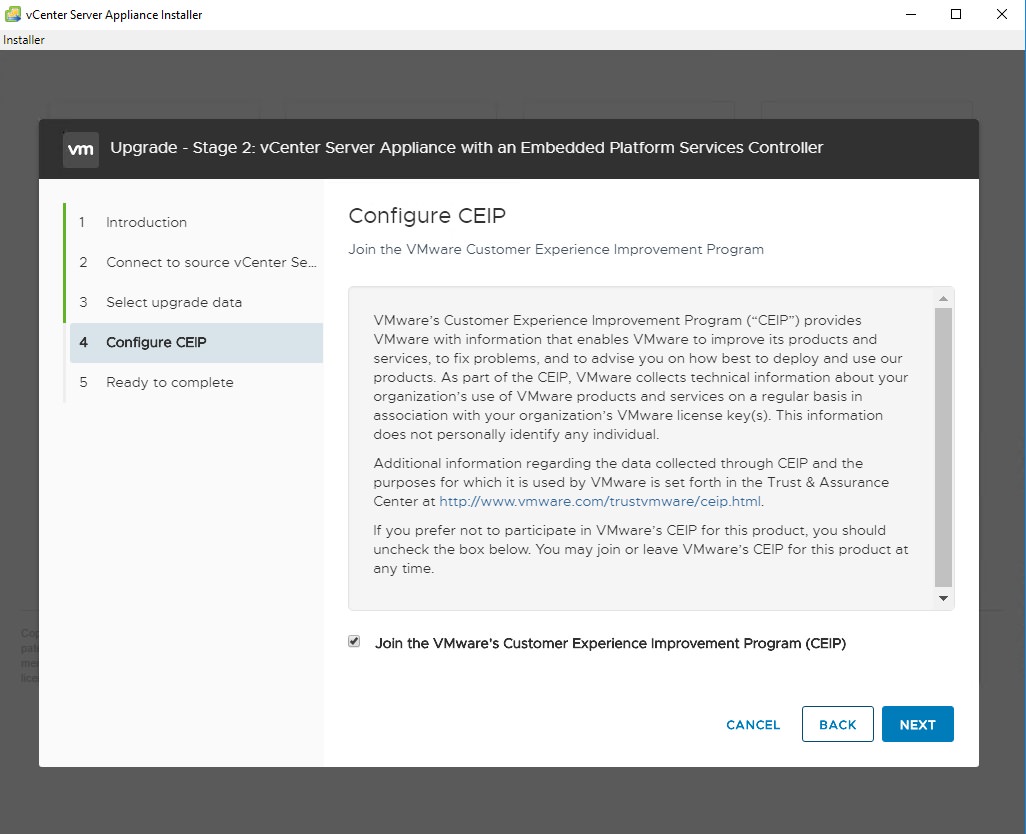
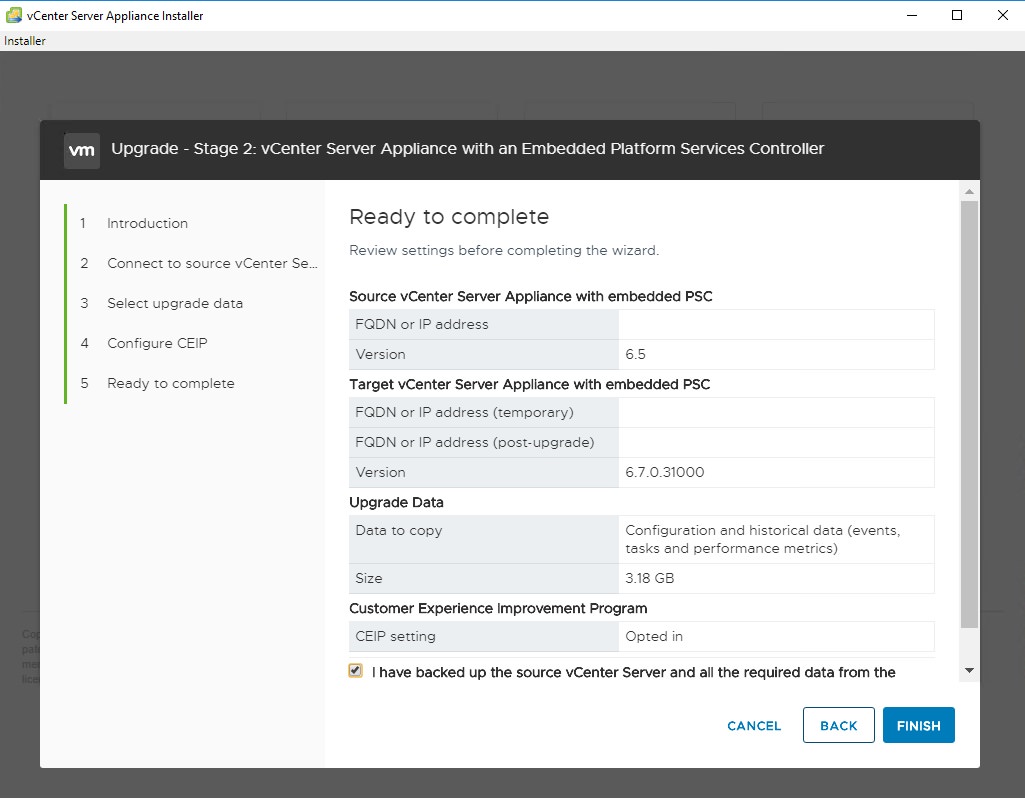
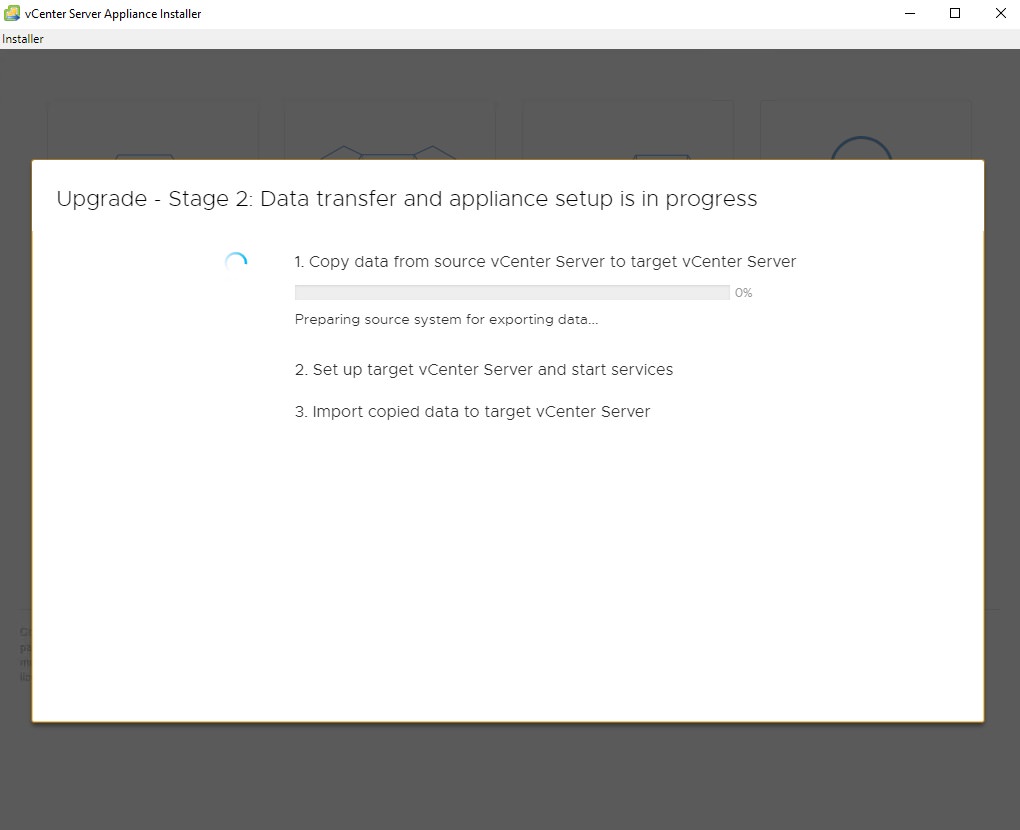
Stage 2 Upgrade VCSA

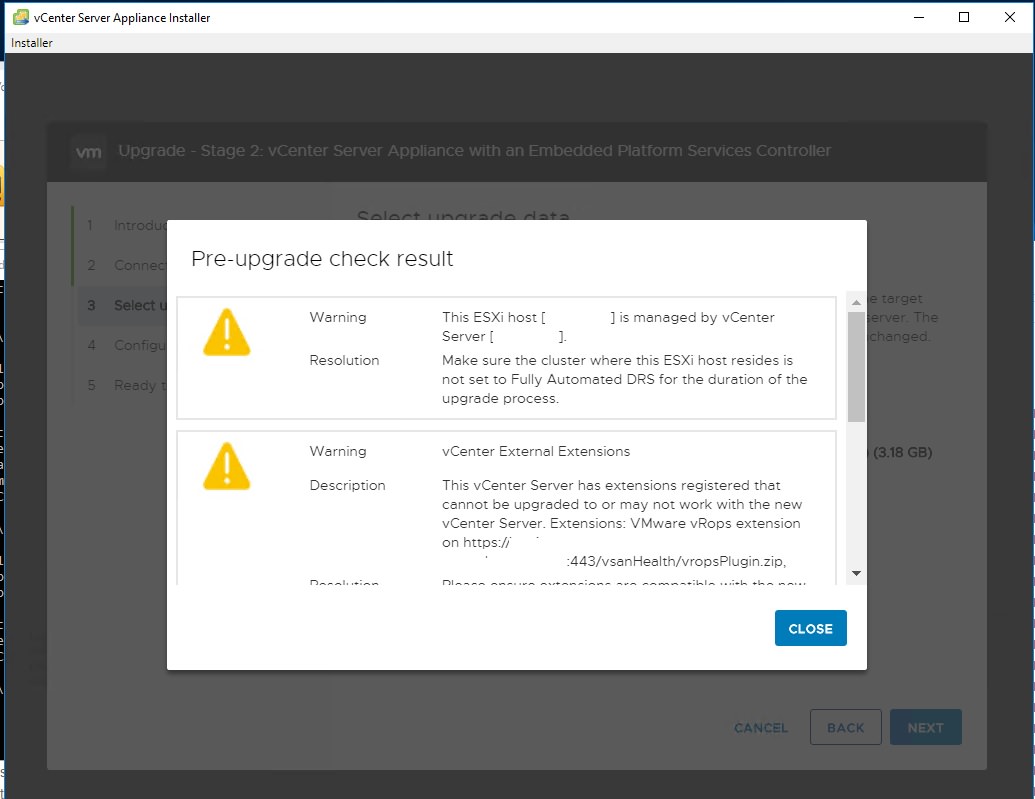
Possible errors during phase 2
NTP error: Make sure your source VCSA has good NTP settings which are the same as the host you are using for source and destination. See this VMware article about configuring NTP. https://kb.vmware.com/s/article/57146 If you don’t have an internal time server, then the recommended option is to point to internet NTP servers: 0.vmware.pool.ntp.org ; 1.vmware.pool.ntp.org ; 2.vmware.pool.ntp.org
Success!!
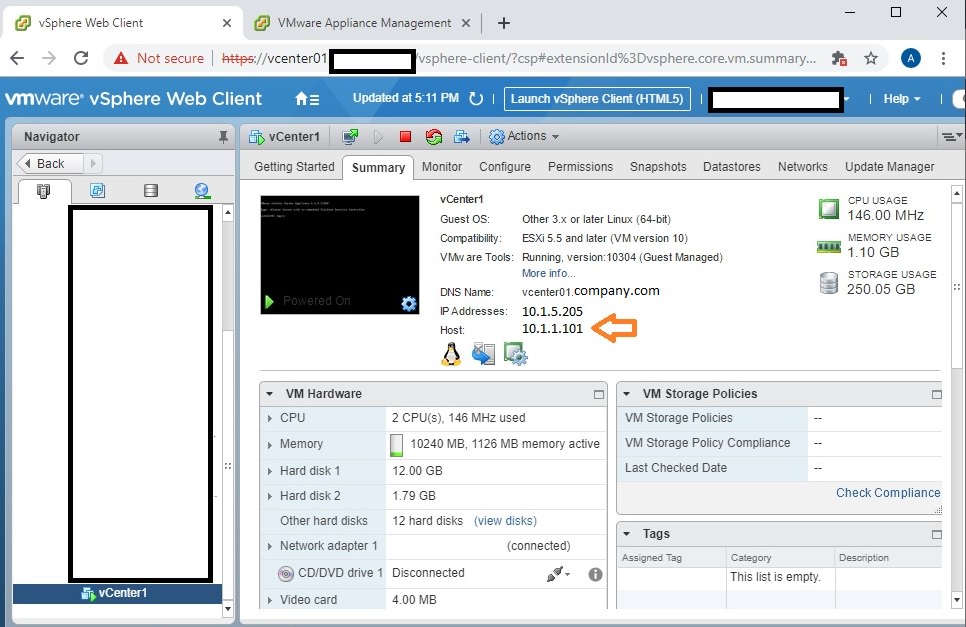
At this point, your upgrade should be successful. When the upgrade wizard completes, your old vCenter will be powered off and your new vCenter (running 6.7) will be powered on.
You may want to rename your old vCenter to something like “old_vCenter01”.
Test your ability to log onto the vCenter appliance (https://vcenter01.company.com:5480)
Test your ability to manage your virtual machines (https://vcenter01.company.com/vsphere-client)
Make sure to check your backup jobs. They should switch to using the new vCenter automatically, but double-check.
Once you are comfortable with the new vCenter and you have at least one good backup of it, you can delete your old one.
Remember that if the new vCenter doesn’t work, you can revert your changes simply by powering it off and powering the new vCenter on. You may need to log into individual hosts (https://host_ip_address) to do this if your vCenter isn’t working.
Troubleshooting:
Manually verify every password for each device (your existing vCenter administrator@vsphere.local, your existing vCenter root, the source ESXi host root, the destination ESXi host root). It is common for the vCenter root to be expired. See my other blog for easy steps to fix an expired vCenter root password.
Orphaned vCenter attempts: If your deployment fails, the new vCenter may display as orphaned. There is no impact at this time, because you will continue using your existing vCenter. I’ve heard that using VMware Workstation to connect to your vCenter will allow removal. There is a blog that describes various methods for dealing with orphaned VMs: https://www.altaro.com/vmware/how-to-deal-with-orphaned-virtual-machines/ For a more authoritative source, see VMware KB article for removal steps: https://kb.vmware.com/s/article/1003742#vmdeleted
Upgrade failed with “Failed to send http datainstaller…” The fix seems to be not using DNS for anything. Change all your server names to IP addresses! Reference https://virtuallyinclined.com/2018/07/30/vsphere-6-7-vcsa-upgrade-issues/
Selfish plug time (sorry!)
Thanks for reading this article! I hope it helps you! If you have tips or feedback, please comment or send me an email so that others can benefit.
I am a consultant in the Maryland/DC area in the USA. My specialties are Windows migrations (to 2016 and to Office 365 / Azure), VMware migrations, Netapp and SAN, and high availability / disaster recovery planning. If you would like help with your complex project, or would like a architectural review to improve your availability, please reach out! More information and contact can be found on the About page. – Amira Armond

VMware vSphere ESXi and vCenter Upgrade 5.5 to 6.0 or 6.5 or 6.7
June 11, 2019 @ 12:31 pm
[…] First, heads-up. You can’t upgrade directly from 5.5 to 6.7. You will need to upgrade to 6.0 or 6.5 first, then perform the jump to 6.7. The steps for vSphere ESXi are the same. vCenter can be a pain to upgrade. Check my other blog with step-by-step instructions for upgrading from vCenter appliance 6.0 (or 6.5)… […]
January 21, 2020 @ 10:50 am
Great Article!!!!
Can you change to thin provisioned during the setup? That way a tiny deployment does not take up 850GB on your datastore!!
January 21, 2020 @ 11:08 am
Hi Gregory,
Good comment. I just updated the article with your advice. Cheers!
January 22, 2020 @ 11:26 am
It’s a great step by step process, but will there be any downtime of VM’s running on old Vcenter while this upgrade is going on?
January 22, 2020 @ 1:13 pm
Hello Pratika,
vCenter is used for centralized management, and for coordinating the vSphere hosts with each other. On a minute-by-minute basis, vCenter is not used for networking, storage, or virtual machine operations. In all cases that I’ve seen, you can reboot, upgrade, power off, etc the vCenter server without affecting currently running VMs. But your ability to manage VMs, perform disaster failover, or migrate between hosts is reduced when it is offline, so you don’t want to have it offline for long.
March 9, 2020 @ 12:19 am
Really Appreciate your efforts!!!
Entire article explains about the key things of vCenter Migration.
Could you also please include the procedure to carry forward the update manger patches from 6.0 vCenter to 6.7
March 28, 2020 @ 8:59 pm
Thanks for a great write up! VCSA upgraded from 6.0 to 6.7.
I ran into one minor issue during the “Upgrade Stage 1: Deploy Appliance” phase. Operation would halt with “Failed to authenticate with the guest operating system using the supplied credentials.” I know they’re good as I can login to VCSA, VAMI, MOB, ESXi using them.
I changed all of the passwords to numbers and letters only with a single known good special character tacked on at the end. Et Voila! Problem solved. The rest of the upgrade proceeds without errors.
Passwords like these will not work with this utility:
Tv5$8FG#m*Djn
7xjg8sP%C#usXH8H
X8xk$vR^q9ccw@WxR
March 29, 2020 @ 8:39 am
Good info! Thanks!
June 7, 2020 @ 4:44 am
hi,
is it possible to change the name and ip of the vcsa during the upgrade?
so it won’t take the original vc params?
June 24, 2020 @ 2:58 am
It’s not advisable to change the name and ip address of your vcenter server during the upgrade. All your hosts will disconnect since they are looking for the vcenter server they were connected to. You can reconnect them but it’s a hassle and in large host environments you may find that a few would not reconnect. You can ssh into the host and edit the file that contains the vcenter ip (I forget the exact name of the file..vmware has an article on it) but it doesn’t always work after restarting the host management services. I ran into this when I upgraded from a windows based vcenter with a separate sql server over to the appliance. I could not use an ip address that was in the same subnet as the existing vcenter..meaning the physical server ip range was not usable within our vmware guest network range.
Major hassle but I got it done. Two of my exchange cluster hosts had to be removed from inventory and re added to the new vcenter to get them manageable again. 42 hosts reconnected easily and 2 did not.
If your host count is just a couple, then you could probably do what you asked about without serious issues.
June 12, 2020 @ 10:12 pm
Woooooooooooooahhhhhhhhh…… Just ran a Clean Update….Tks a Lot!!!
June 19, 2020 @ 5:33 am
Errors and how to fix.
VMware Tools driver is not initialized. Make sure that VMware Tools driver is initialized and is running properly on the source vCenter Server Appliance (Sample_FQDN). Also make sure that the ESXi host which contains the source vCenter Server Appliance is not under heavy load. Contact VMware support in case the issue cannot be resolved.
Create or recreate the /etc/SuSE-release file with the below content using a text editor
PATCHLEVEL = 3
VERSION = 11
SUSE Linux Enterprise Server 11 (x86_64)
See article 59157
Upgrade Error “Insufficient space on the source export partition ‘/’.
Stage 2 Option 3
login to VCSA as root
df -h and check which directory has plenty of free space. In my case is was /storage/core
add that to where it says export directory and continue the upgrade.
Stage 2
After completing the upgrade you get a message about NTP out of synch. To fix
Login in as root to the web interface of the old VCSA and to to time. Make sure its host that is selected.
June 27, 2020 @ 6:17 am
That was really helpful,
but got an issue while connecting to Vcenter resources, the error “Failed to authenticate with the guest operating system using the supplied credentials” facing this error is not because of changing Password inter just later and number but it was due to password expired
June 28, 2020 @ 8:46 am
Hi it’s a lovely article
Temporary IP that we use in stage one, do we need to open certain ports for it??
if yes , then which ones and from where to where?
If no, then simply a unused IP is fine from same IP segment will be fine?
July 2, 2020 @ 1:01 pm
Utterly brilliant article, worked first time … Thanks for taking the time to share your findings.
August 25, 2020 @ 12:21 pm
Nice Article… But continues to fail at Phase 2 60% as non-recoverable and no real error message other than unable to start
Trying to upgrade vcenter from 6.0 to 6.7 on 6.0 Hosts…
November 12, 2020 @ 10:20 am
I’m curious about what’s your old vCenter VM name? vCenter01 ?
December 23, 2020 @ 8:38 am
Where did you change the original IP addresses of VC?
January 22, 2021 @ 2:25 pm
Great Article updated vcenter from 6.5 to 6.7U3
January 24, 2021 @ 2:59 pm
When entering the vCenter name, I tryied to use the same name and I received an error message that that name was already in inventory.
January 25, 2021 @ 1:31 pm
Yes, that is expected behavior. They want to leave your old vCenter intact so that you can revert to it if something goes wrong.
January 28, 2021 @ 1:20 pm
Thank you so very much for putting this good information out there.
It was a great comfort to have you detailing the potential issues…It gave me the confidence that it wouldn’t blow up!
I did the upgrade in place from 6.0 to 6.7u3 and it was a fantastic success back in November.
February 1, 2021 @ 9:14 pm
Amira, great guide! Good starting point for this process.
However in doing due diligence, one other fairly common factor to point out. Many people could be coming over from VCSA 6 with Update Manager roll deployed on a Windows Server. Consideration needs to be made here! To either retain this as part of upgrade, or my preference is to drop and replace this with the one now built into VCSA 6.7.
To retain, you would need to: run the VMware Migration Assistant on the source Windows physical server or the Windows virtual machine where Update Manager runs.
To start fresh, after backing up existing VCSA 6, but prior to starting the upgrade process, you would need to: Remove the vSphere Update Manager extension (using mob if needed)
Useful links on this topic:
https://docs.vmware.com/en/VMware-vSphere/6.7/com.vmware.vsphere.update_manager.doc/GUID-88A0BADB-1A3B-45A1-8A34-7A9E91887D31.html
https://docs.vmware.com/en/VMware-vSphere/6.7/com.vmware.vsphere.update_manager.doc/GUID-189A0050-1680-42A3-A13E-8FDCBE9FB03F.html#GUID-189A0050-1680-42A3-A13E-8FDCBE9FB03F
https://kb.vmware.com/s/article/67375
Cheers!
February 1, 2021 @ 9:40 pm
Hi Greg, thanks! I have updated the preamble to point Windows vCenter folks to your comment. Cheers!
February 2, 2021 @ 12:27 pm
Amira,
Need to clarify. My comments applied to your guide when updating the Linux based VCSA, not vCenter running on top of Windows Server. With VCSA 6, the Update Manager still needs to run on top a Windows Server. They didn’t build that into VCSA until version 6.5. So all your steps in the guide apply, with the addition of steps I commented on for Update Manager running outside of the VCSA on top a Windows Server.
Now if you read the vCenter upgrade guide, they do cover the scenario of converting from VC on top Windows Server, to stand-alone Linux based VCSA. It can only be done when upgrading to a newer version, say VC 6.0 or 6.5 to VCSA 6.7.
https://docs.vmware.com/en/VMware-vSphere/6.7/vsphere-vcenter-server-67-upgrade-guide.pdf
(Chapter 5: Migrating vCenter Server forWindows tovCenter Server Appliance)
Most of the steps you outline in this guide would also apply in that scenario.
Best of luck to everyone pulling of these upgrades!
February 11, 2021 @ 1:20 pm
Excellent article
April 12, 2021 @ 6:50 am
This is such a great article. Except I ran into an issue with the upgrade with NTP not synchronising and hit the close button. Now when I try and continue the installation by navigating to https://vcsa_url:5480, I get: “This appliance cannot be used or repaired because a failure was encountered. You need to deploy a new appliance.”
I took the snapshot in vcenter you recommended at the start of this blog but now I’m stuck because I don’t know how to restore from the snapshot without my vcsa being accessible.
Any help would be much appreciated!
April 12, 2021 @ 6:55 am
Hi Lloyd,
I re-wrote this answer..
You can restore from snapshot using the ESXi host website. https://esxihost
Hopefully you remember which ESXi host your vcenter was on before.
Good luck,
Amira
April 12, 2021 @ 7:00 am
Amira! You are very kind. Thank you soooo much! Crisis averted and I can now try this again following your instructions.
April 5, 2022 @ 8:24 am
This why it is recommended to make a note of the ESXi host your source vcenter is on, and set DRS to manual for the duration of the works – that way it stays where it is meant to!
October 7, 2021 @ 7:51 am
Is it an obligation of moving the .iso file to upgrade vcsa 6.0 to 6.5 on the vSphere Update Manager’s VM ? Is there another emplacement where to copy the .iso file ?
May 23, 2022 @ 7:44 am
Hi,
Thanks for the article. Is it possible to perform this upgrade just by using the VAMI page or via CLI using Putty?
Thanks,
Matt