
Microsoft Teams for conference calls and dial-in phone numbers
I recently went through the steps to set up conference call bridges on Microsoft Teams for my own organization. Specifically, this means dial-in phone numbers that I or people outside my organization can use for a conference line. Here is how I did it, with tips and information to save you time.
This article is for you if:
- You are an Office 365 Admin for your organization
- You have at least one user with Office 365 E3 or E5, Education, or Government plans. Note: Looks like Office 365 “Business” does not include Teams. Office 365 E5 includes the “Audio Conferencing” license for each user, which will save you some money.
- You want your user to be able to host conference calls with a phone number that non-teams people can dial.
I’m excited about using Teams for conference calling. I’ve used many other services such as Webex, Zoom, GoToMeeting over the years but it is annoying that they don’t automatically synchronize with Outlook. Microsoft Teams has a major advantage in that you can see availability, invite people, and reserve your calendar and room all in one place. It is also a great price at $4 per month per conference leader. And it is really easy to set up and use!
The Microsoft documentation for Teams is terrible (sorry, Microsoft, I love you, but seriously!), which is why I wrote this article. I read through all of it and still ended up contacting support several times. It doesn’t have to be that hard. Read through my article to easily set up Microsoft Teams conference calling. Note: It will take about 24 hours for the feature to enable itself.
How much does a conference line for O365 Teams cost?
At the time of this writing (Oct 2019), there are two license options.
“Audio Conferencing” costs $4 per user per month. This “Enables users to dial-in a number to join meetings, or dial-out to bring participants into the meeting”. Per Microsoft support, this is the correct license for our purposes here. This should enable basic conference call ability, very similar to WebEx or Zoom. This license is only needed for conference hosts (people who organize the meeting). Participants do not need an audio conferencing license. Per Microsoft, a conference number can support up to 250 callers.
“Phone system” costs $8 per user per month. This is “for organizations that need call management capabilities (make, receive and transfer calls in the cloud…” I haven’t tested this license fully yet. I think it is for users who need their own phone number for make calls (similar to having a phone at their desk). Update: You do not need this license to host a conference bridge with phone number. But if you get it, it will also handle the conference calling.
Microsoft – extended description of Audio Conferencing vs Phone System vs other add-on licenses: https://docs.microsoft.com/en-us/MicrosoftTeams/teams-add-on-licensing/microsoft-teams-add-on-licensing
How to try conference calling on Teams for free
If you want to test this out without spending any money, get a trial subscription to “Office 365 E5” – this includes the Office prerequisite and the Audio Conferencing license.
Microsoft – quick setup and trial for Audio Conferencing: https://docs.microsoft.com/en-us/MicrosoftTeams/try-or-purchase-audio-conferencing-in-office-365-for-teams
How to enable conference calls on Teams for the first time
1. Purchase the Audio Conferencing add-on license
This assumes you already have an Office 365 organization set up and at least one user has O365 Enterprise, School, or Government licensed.
- Sign into Office Admin Center with your admin account
- Choose Billing > Purchase Services
- Choose “Add-ons” – this is a link at the bottom of the page.
- I selected “Audio Conferencing” and for my purposes, a monthly commitment. Unchecked “automatically assign to all of your users with no licenses” since I only need a conference line for one person right now.
- I followed the purchase license wizard. Success.
- I went back to the Admin center > Users
- Select the user I want to host conference calls.
- In the user management window that appears, I selected the Licenses and Apps menu item. This brings up a list of available licenses.
- I add a check to the “Audio Conferencing” license and save changes.
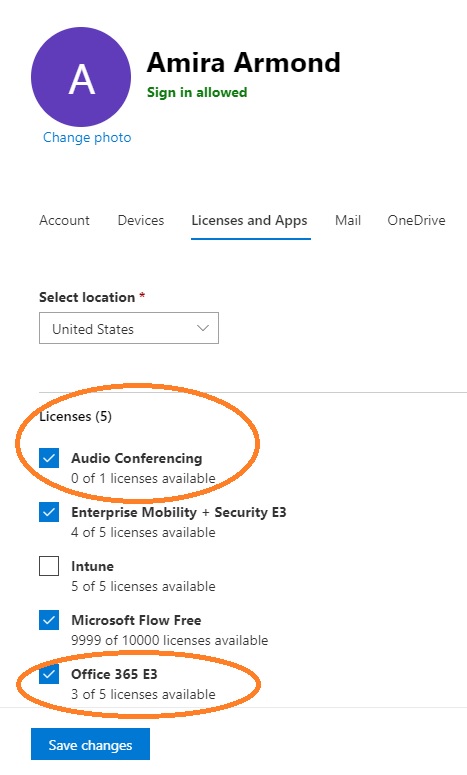
You user needs an Office 365 license (Enterprise, Government, or School since these include Teams) and the Audio Conferencing license.
Microsoft – How to buy a calling plan license: https://docs.microsoft.com/en-us/microsoftteams/calling-plans-for-office-365
Microsoft: About Audio Conferencing: https://docs.microsoft.com/en-US/MicrosoftTeams/audio-conferencing-in-office-365
2. Wait for 24 hours for the audio conferencing license to synchronize
If this is the first time you’ve activated an audio conferencing license, it can take several (up to 24) hours for Microsoft to enable the bridge ID / conference line functionality. When I didn’t wait, I encountered lots of errors on the Teams Admin site. I don’t know if the setup time applies to future audio conference licenses as well (please comment if you know).
Symptoms of pending Microsoft Teams synchronization:
- Your O365 user has NOT gotten an email about their audio conference yet.
- From Teams Admin, go to Legacy Portal (Skype for Business admin center) and select “audio conferencing” , then select “users” from the top menu… when I select my user, it shows the message “Microsoft audio conferencing license status Pending: 1”
- From Teams Admin, go to Legacy Portal and select Audio > Phone numbers. Select a phone number and edit it. The Name field is blank. It will give an error if you try to assign it.
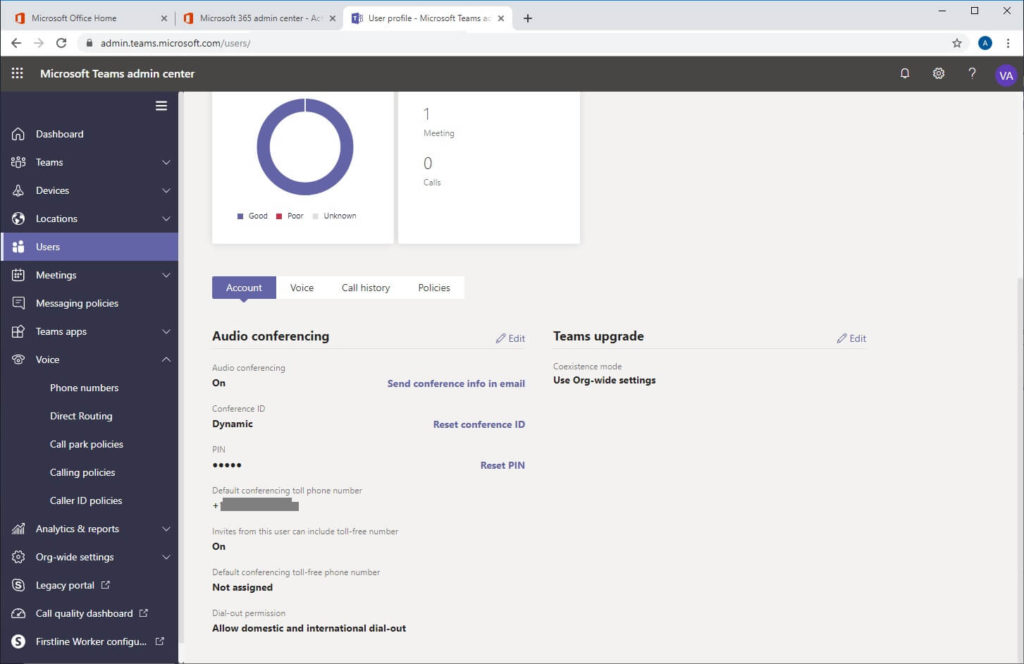
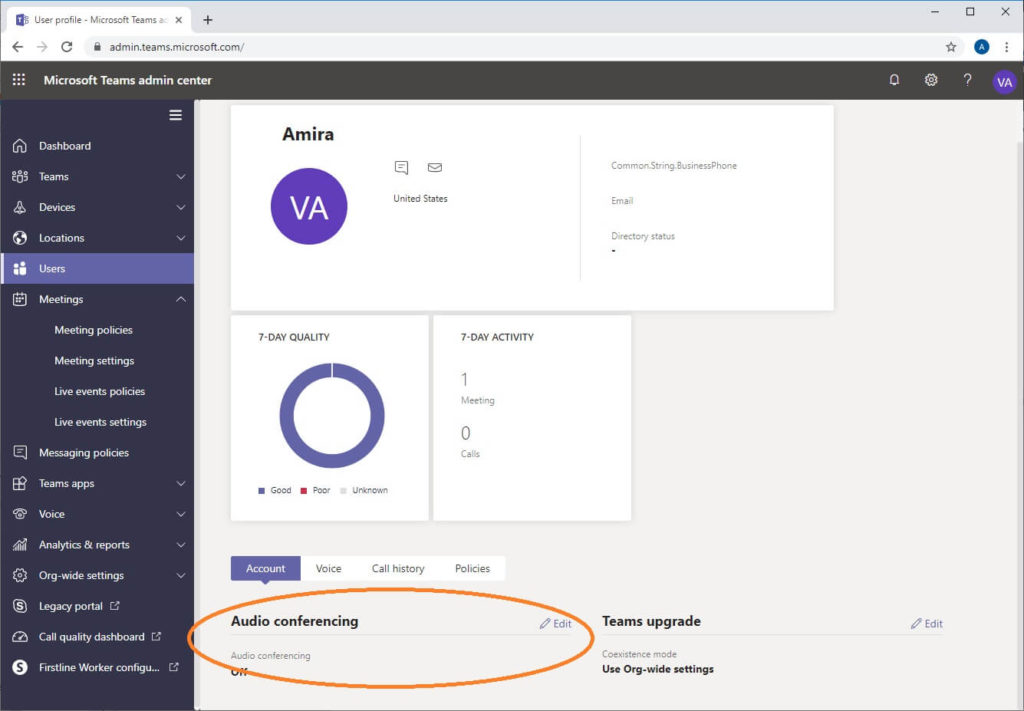
- From Teams Admin, go to Users. Select a user that is licensed for audio conferencing and O365. At the bottom of the page, you will see “audio conferencing”. When you try to edit this option, you cannot enable it.
3. Your user will get an email with conferencing dial-in for Teams or Skype
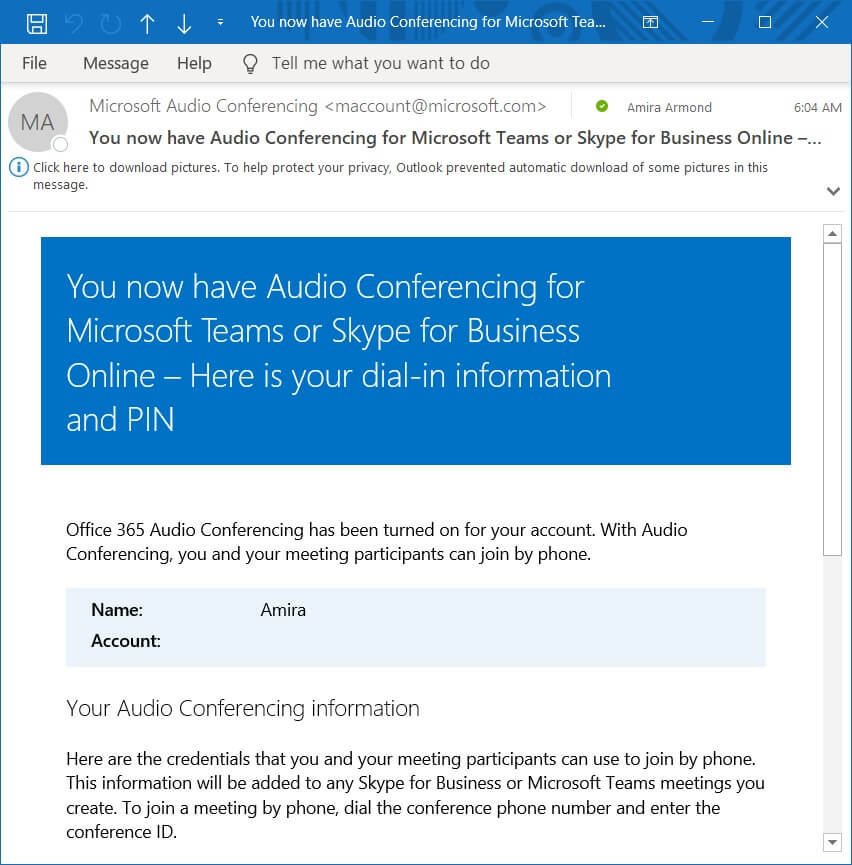
- Within 24 hours (it took 20 hours for me), your user will get an email from Microsoft
- This email will tell the user that they have Audio Conferencing for Microsoft Teams
- It will give them their conference phone number
- It will provide the conference leader PIN (used if you are leading the meeting without the Teams app)
- If you open O365 Admin > Teams Admin > Voice > Phone Numbers, you will see a new phone number appear here. It will be “assigned”.
Your Microsoft Conference Calling should work now!
If you use Outlook to schedule a Meeting, you will see an icon in the top menu that says “Teams Meeting” or “New Teams Meeting”. Use the Teams Meeting” option to automatically include dial-in and online meeting information to your Outlook invite.
If you don’t see this option, make sure that your user is logged into their Office 365 account with their office products. This should be already be working if they are using the email address that is registered in Office 365.
Creating your first audio conference (with phone #) meeting in Teams App
Once your user has gotten the Audio Conferencing welcome email, you can try it out!
- Have your user close and reopen Microsoft Teams (this may be an extra step, but just in case…).
- In Teams app, go to Calendar
- Click the + New Meeting button
- Fill out the meeting details (name, start date and time). Invite some people – in my case, I invited someone who doesn’t use Teams. Click Schedule.
- Don’t worry that the audio conference information isn’t displayed. It will appear on the next step.
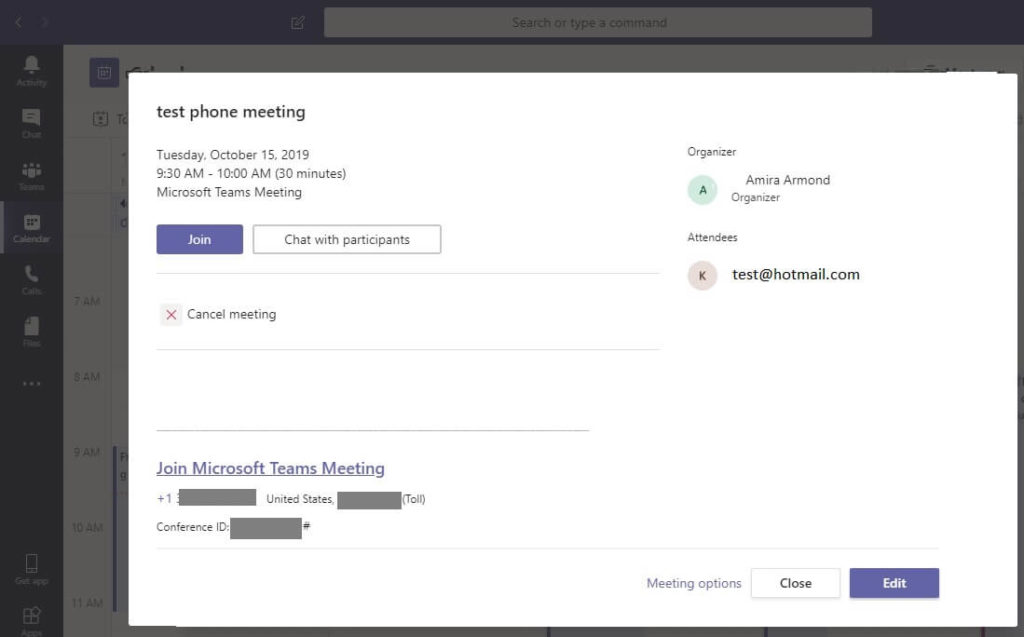
- You will see the meeting confirmation and options. Right now, your invitees are getting emails and your O365 outlook calendar will update with the meeting.
- The dial-in phone number and conference ID for teams will display. Note that the Conference ID should change for each meeting.
- On this screen, you can change the Meeting options. I recommend modifying the “Who can bypass the lobby” option to “everyone“, especially if you will be hosting the call from your phone.
Outlook audio conference (with phone #) Teams meeting
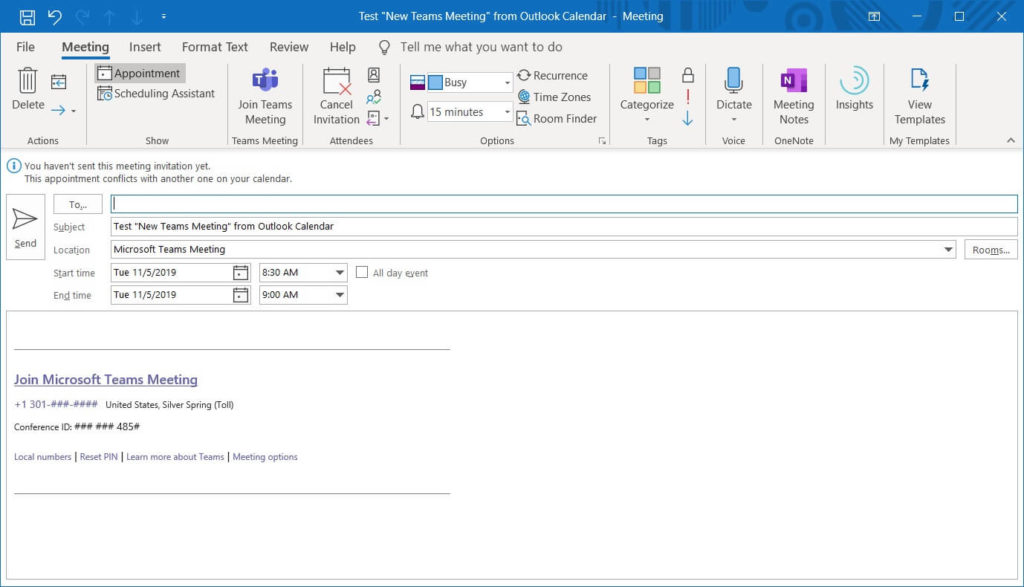
You can also create a conference-call enabled Teams meeting directly from Outlook’s Calendar.
Schedule a normal meeting in Outlook, but before you send it out, click the “Teams Meeting” button. This adds the conference to it (you will see the conference information in the meeting body).
You can also open existing Outlook meetings and click the Teams Meeting button to add conference calling to them.
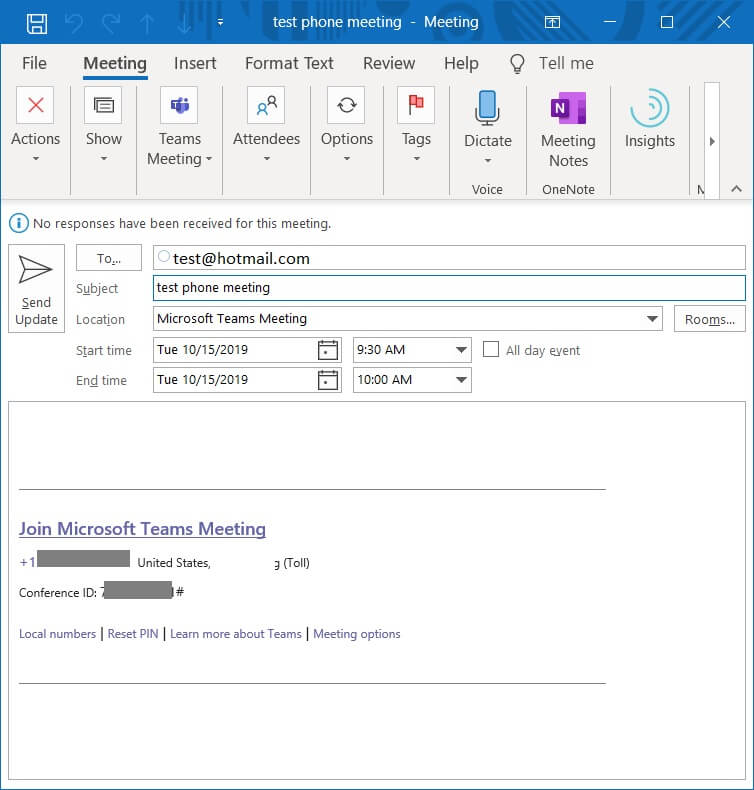
Teams automatically synchronizes with your Outlook Calendar. This is the meeting information as viewed by the host. From here you can forward to additional invitees (the dial-in information is included) or change other settings.
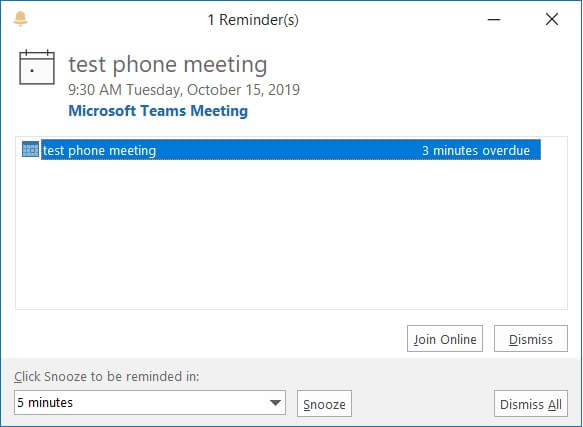
Again, automatic synchronization with Outlook. It will remind you to start your Teams meeting.
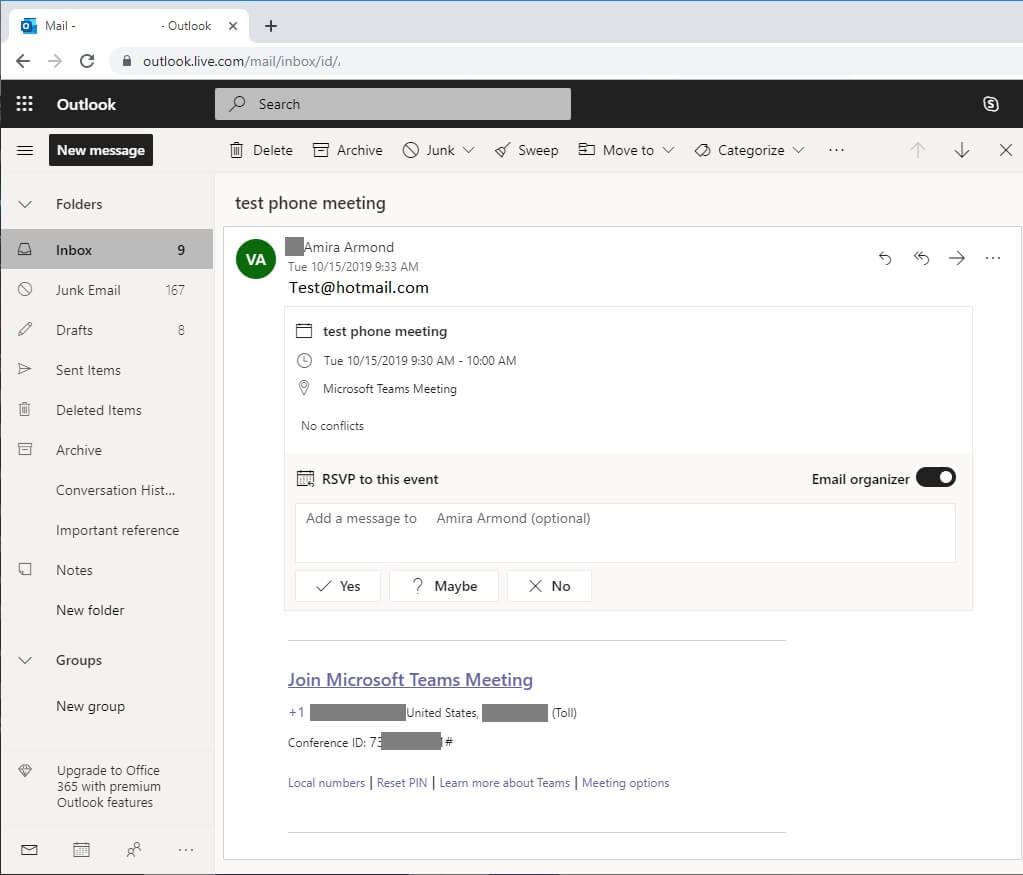
This is what a Teams conference invite looks like to people outside your organization (who don’t have teams). The audio dial-in number is listed in the invite.
When your meeting starts, remember that by default, dial-in participants will be stuck in the lobby. You can allow them to join the meeting from the Teams app.
If you will be dialing in to your own meeting, I recommend setting the meeting options to allow Everyone to bypass the lobby.
About assigning phone numbers and meeting IDs in Teams
When you set up your first conference phone number in Teams, it looks like all licensed users will use that phone number by default. This may change if you are a large organization with more users. If you know how this works with more users, please leave a comment below!
Different meetings on that phone line will be split out using the Meeting ID, which is a different (dynamically assigned) number for each meeting. So potentially your meeting host could run two different meetings simultaneously.
This is the same way that conferences work on WebEx or Zoom. Many meetings can use a single dial-in phone number at the same time. Each meeting uses a different Conference ID.
If you read through the Microsoft KB articles on this process, the steps to create a new phone number show up everywhere. From what I can tell, reserving a phone number doesn’t cost anything. However, there doesn’t seem to be any advantage to having more than one phone number (for small/med business audio conferences). You can’t use the phone numbers without licensing your user(s). For basic conference setup, you only need one phone number which should get created automatically and assigned by Microsoft when you assign the “audio conferencing” license to the user.
Microsoft – quick setup and trial for Audio Conferencing: https://docs.microsoft.com/en-us/MicrosoftTeams/try-or-purchase-audio-conferencing-in-office-365-for-teams
Below are Teams steps you should NOT need to perform for basic setup.
1. Adding audio conferencing from the Teams Admin Portal
- Sign into Office Admin Center with your admin account
- On the left menu, click … Show All to see the other admin centers. Pick the Teams admin center.
- On the left menu, click Users.
- Select the user you want to host dial-in meetings.
- At the bottom of the user view, you will see an area for Audio Conferencing. You can click the Edit button to change your settings.
- You may need to enable Audio Conferencing for the user. In my case, this area updated automatically 20 hours after I assigned the Audio Conferencing license to my user.
2. Reset Teams User PIN and Conference ID, re-send welcome email
If your user loses their audio conference information, particularly the leader code / PIN, you can reset it from the Teams admin center.
- Sign into Office Admin Center with your admin account
- On the left menu, click … Show All to see the other admin centers. Pick the Teams admin center.
- On the left menu, click Users.
- Select the user in question.
- At the bottom of the user view, you will see an area for Audio Conferencing.
- There is a button to reset PIN if needed, and it displays the phone number assigned to the user’s bridge line.
- You can also re-send the conference information to the user via email from here.
3. Not needed – Add a new Teams phone number
This should only be needed if you want to use a different area code or phone number than the one automatically generated.
- Sign into Office Admin Center with your admin account
- On the left menu, click … Show All to see the other admin centers. Pick the Teams admin center.
- On the left menu, click Voice then Phone numbers
- Click the + Add button to request phone numbers
- The wizard will start.
- Country or region: (I picked United States)
- Number type: I picked Dedicated Conference Bridge (Toll). Toll normally means that the caller has to pay long-distance charges (not an issue for my clients). Toll-free means that my organization would pay long-distance charges for the caller, which could result in an unexpected expense, so I avoid it.
- Location: I needed to Add a location – an option which appeared when I selected the drop down. In my case, I typed my office address in and it auto-resolved the rest. You can drag and drop the map locator to identify your precise coordinates. This is important for the “Emergency Location” identity, which is automatically provided to emergency services if someone uses that number to call for help (9-1-1 in the USA).
- Area code: I picked my preferred area code (from a list of codes that match my location)
- Quantity: I picked 1 for this exercise.
- Order Name: I typed “001” for the name and “testing teams conference call phone order” for the description at the top of the page.
- Next…
- A progress circle displays “Thanks for your patience, but we are making sure we reserve the right numbers for you.”
- Get numbers displays: You get 10 minutes to confirm your order. It displays the phone number you will get if you place the order. I clicked Next…
- Success message. The website says that the phone numbers will appear in the list as soon as they are available. Finish.
- The phone number displays in the list.
Error requesting Teams phone number
- When I first tried this Teams wizard, I got an error: “We can’t get the list of available countries or regions.”
- The second time I tried the Teams wizard, I got further, but then failed again at the last step (to reserve the phone number).
- The support link sent me to PTN@microsoft.com . I emailed them with my woes and they responded immediately. I eventually completed the phone number registration process via email. However, I’m including the normal steps below in case you don’t see an error. The wizard has worked fine for me since then.
4. Not needed – use Teams / Skype Legacy Portal to assign a phone number
According to the Microsoft KB articles, you need to assign the phone number using Legacy portal to enable the conference bridge. In my experience, this was NOT necessary. Once my user got the welcome email, everything worked. Microsoft automatically generated a new phone number and assigned it to the user.
This setup may be needed once you have dozens of licensed audio conference users. Or if you don’t want to use the automatically assigned phone number for your organization.
- Sign into Office Admin Center with your admin account
- On the left menu, click … Show All to see the other admin centers. Pick the Teams admin center.
- On the left menu, click Legacy Portal (this takes you to the Skype for Business admin center)
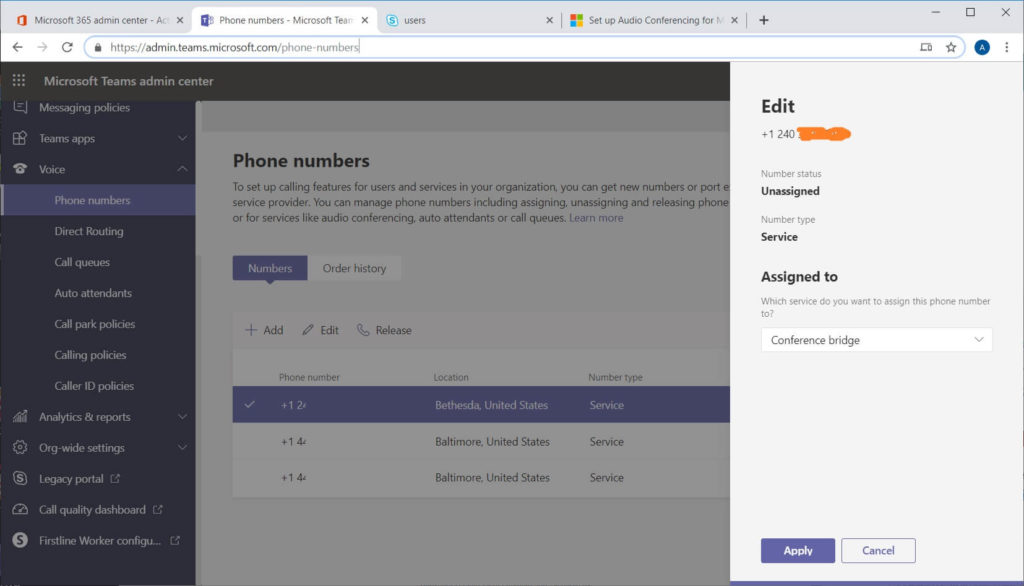
- On the left menu, select Voice > Phone Numbers
- Select a phone number. You will see an option appear to “assign” the number. Click Assign.
- This brings up an Assign dialogue. If synchronization is complete, you will see “Name: Conference bridge” listed.
- If you assign here, your users will have that phone number assigned to them for their conference line. The meetings will be created individually using the Conference ID (just like WebEx and Zoom, you can have many different meetings with one phone number)
Teams – Assign or change the phone number on your audio conferencing bridge: https://docs.microsoft.com/en-us/MicrosoftTeams/change-the-phone-numbers-on-your-audio-conferencing-bridge
5. Not needed – Assign phone number to user in Teams Admin
This step appears to be used for the “phone system” license only (phone numbers assigned to users to replace their desk phones). Currently, the conference bridge assign functionality works better from the Teams Admin > Legacy Portal
- Sign into Office Admin Center with your admin account
- On the left menu, click … Show All to see the other admin centers. Pick the Teams admin center.
- On the left menu, click Voice > Phone Numbers.
- Select a phone number. Click the Edit button.
- Error: “You need to buy a Phone System license and make sure it’s been assigned to the user”. when I don’t have a phone system license….
- If you have a phone system license… You will see a drop-down option for “Assigned to” –
- You will have several options to pick from. The first option is a user line, which I think is appropriate for the Phone System license.
6. Not needed – Set up communications credits for international calls
Several Microsoft KB articles say to set up communications credits, and that they a “free”. I have not needed to do this yet. I believe this is used for toll-free calling, which is not necessary for most users. Please leave a comment if you know more!
I hope this article has been helpful to you. I am very excited about using Teams and Office 365 for official conference calls. It is the best value that I’ve seen out of the various competitors, and automatic synchronization with Outlook calendar is a time saving benefit.
Please comment if this helped you or if you can share your lessons learned with setting up Microsoft Teams for conference calls!
Next articles for Microsoft Systems Admins:
Exchange admins: How to identify and fix Information Store “starting” due to missing/changed network card.
Domain admins: The only correct way to rename a domain controller (2012, 2016, 2019).
Exchange admins: Lessons learned from setting up a 2-site Exchange 2016 DAG
I am a consultant in the Maryland/DC area in the USA. My specialties are Windows enterprises (upgrades to 2016 and to Office 365 / Azure), VMware migrations, Netapp and SAN, and high availability / disaster recovery planning. If you would like help with your complex project, training, or would like a architectural review to improve your availability, please reach out! More information and contact can be found on the About page. – Amira Armond

January 11, 2020 @ 6:37 pm
Thank you for this post. I’ve wasted a great deal of time trying to follow the misleading Microsoft documentation that instructs to do many of the steps you marked as “not needed”. The official documentation is HORRIBLE and there are pages with many links to follow down this road to nowhere.
This has me seriously considering cancelling my SMB migration from GSuite to O365. With GSuite, the Google Meets app automatically includes dial-in conference numbers by default with zero-config or hidden extra costs of “Enterprise Plan + Phone add-on” requirements.
I’m surprised none of the “Gsuite vs O365 review” websites mention this important point, which confirms my assumption that 99% of the review blog posts are from people that haven’t actually used Teams in a real-world SMB environment. I’m glad you took the time to create this excellent post.
May 15, 2020 @ 11:54 am
Our emails went our as soon as we turned on the licenses. The conference line was working great. Now we are getting a “This meeting cannot be found” audio message after you type in the conference ID number. I’ve tried several times to make sure the ID number is typed correctly. Trying to find trouble shooting info on this issue.
May 20, 2020 @ 8:08 pm
Just like your other comment from Kevin, I went through every piece of Microsoft documentation in regards to Audio Conferencing. There are no clear cut instructions and most of the documentation ties you to something about another product like Phone System. Trying to configure Audio Conferencing without clear instructions leads you into an abyss where you get multiple errors about missing other licenses. I wish I would have found this article a month or two ago. Thank you for taking the time to create this.
June 2, 2020 @ 3:17 am
Hi,
How much Dial Out minute is available by default to a user with Audio Conferencing License?
June 2, 2020 @ 6:42 am
Hello Hussain,
I don’t think Audio Conferencing gives you the ability to dial out.
That would be the Phone System license, which costs more.
September 23, 2020 @ 10:36 am
can we use audio conference number for international calling?
September 23, 2020 @ 10:57 am
Hello Vinita,
Audio conference numbers can’t be used to call out from.
I don’t see anything that would stop an inbound international call to a conference number. It would have standard rates applied either to the caller (if a Toll number) or to the host (if a Toll free number).
February 10, 2021 @ 3:17 am
Hi Amira i went all this steps
Sign into Office Admin Center with your admin account
On the left menu, click … Show All to see the other admin centers. Pick the Teams admin center.
On the left menu, click Users.
Select the user you want to host dial-in meetings.
At the bottom of the user view, you will see an area for Audio Conferencing. You can click the Edit button to change your settings.
You may need to enable Audio Conferencing for the user. In my case, this area updated automatically 20 hours after I assigned the Audio Conferencing license to my user
But the Audio conference icon is not there and the user has the correct license, it was working before and just disappeared form his app and admin portal